Hi Doug,
You need to start back from scratch with this to try and pinpoint the problems.
I would suggest the following:
Remove all ground straps from the radio and vehicle body that you may have put on. take them all off. Make sure that the radio is directly connected to the battery appropriately and make sure that there is nothing connected to the radio including speakers. make sure that all other radios are off also. Nothing electrical should be running in the car, including inverters, phone chargers etc.. Preferably the car should be OFF...
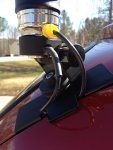
First, remove the ATAS from the mount, remove the mount and all ground straps that you may have attached to the mount.
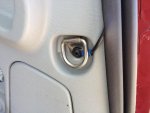
Where you are placing the mount on the vehicle, measure the area where the screws from the mount will screw into the vehicle surface. The mount has 4 screws, the outer two screws need to make full contact with the vehicle's metal. The mount came with a piece of aluminum that you have to cut, so when you put in under the mount lip, the inner 2 screws will press the mount to the vehicle body, but the outer 2 screws will continue to screw into the vehicle area.
NOTE: YOU MUST REMOVE THE PAINT OF THE VEHICLE TO BARE METAL IN THIS AREA. SCRAPE IT OFF TO THE METAL, SAND IT LIGHTLY AGAIN TO THE METAL. ONLY UNDER THE LIP ON THE INSIDE WHERE THE SCREWS ARE...
Once you do that and attach the mount to the vehicle put some silicone around the area to seal out moisture. Periodically you should remove the mount and reapply this to protect the vehicle.
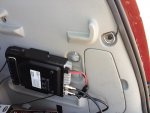
2. you can use a volt-ohm meter to check continuity to make sure that you have a proper ground to the vehicle door. Then check the continuity to the vehicle body also. If there is no continuity to the vehicle body, then the correct way to rectify this is to attach a ground braided strap from the door to the vehicle body. Again directly to a metal surface not a painted surface. Check ground where you are putting it with a V-O meter. Do Not attach a ground strap of any type from the antenna mount to the vehicle. Do not wrap the coax around anything.... you can clean the installation up after it checks out.. Do not ground the radio..
3. Once this checks, next is attach the ATAS to the mount. Make sure their is no crimping or bending or breaks on the coax of the mount anywhere. If there is you will need to replace the coax. The number 1 reason why the antenna doesnt tune is improper menu setup, the second reason is a break or crimp on the coax. The radio send a current to the antenna and if there is a break in the coax, it will fail to initialize/tune.
3. Once this is done, remove the duplexer from the radio, and connect the coax to the radios HF port.
4. Go to the ATAS antenna menu, and first select the off option. exit the menu, shut the radio off. Turn the radio on, go back to the menu option make sure that its on off, rotate the dial to select HF only. Exit the menu, at the radio screen select the option for the Tuner, press and hold the tune button to start initialization. Initialize the ATAS antenna, this can take several minutes : DO NOT TRANSMIT OR TOUCH ANY BUTTON ON THE RADIO OR THE ANTENNA ITSELF while this is going on.......
If it doesnt initialize check the coax along the entire length.Check the connectors. Also the radio will not tune if the battery voltage is low. You can do a continuity check of the inner pin on the coax to the outer part of the connector. If there is continuity there, you have a problem with the coax...Do not go by the radios voltage reading. Check the vehicle battery, Try and do this with the car off, but if you cant then turn the car on. It will not initialize or tune if the vehicle battery is low.
Once its initialized, select the band for 40m , choose an appropriate freq, and press the tune button. See if the antenna tunes.?? If it tunes, which means the antenna will almost fully extend. Try making a contact. Then switch bands to 10m choose an appropriate freq, hit the tune button and see if the antenna will retract almost all the way down.
If it does this, then attach the duplexer, go back to the radio menu for the tuner, switch it to off, again, shut the radio down, turn it back on, go back to the menu, make sure its still on off, rotate the dial to select "ALL" exit the menu. Reinitialize the antenna, and choose a freq on 40m first. If it tunes, then select the 10m band, if it retracts, then select the 6m band, it should almost close completely.
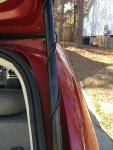
If all works then you are good to go, clean up the wires, do not wrap the wires around anything. keep everything clean, and make sure that when you close the door etc.. the wire doesnt crimp.
Contrary to popular belief the ATAS "DOES" need a good ground, but it can get a good ground if you simply remove the paint under those screws. The problem is when the door you are mounting it on doesnt ground to the vehicle Then you have to ground the door to the vehicle "NOT THE ANTENNA TO THE VEHICLE". It will be properly grounded through the mount.
The radio doesnt have to be grounded to the vehicle.
Some vehicles are a pain with the ATAS. But only cause there is poor grounding or no grounding from hatchback doors to the vehicle.
I hope this helps, I know its a lot, but to guess without removing everything is more of a headache than starting fresh and simple. If you have a friend who has the same setup that works already, I would say bring over your ATAS and try it on his radio. It could be faulty, sometime I know this from a couple of local hams, they caused damage to it, by turning the antenna manually.
George
N2ZNC