CryptoBoy
Member
- Joined
- Dec 7, 2004
- Messages
- 25
This will be a multi-part thread showing a multiple-radio install in a 2018 Ford F150 supercrew truck. It is primarily intended for future reference for those who need to do similar work. I have benefited greatly from these threads in the past and thought it high time I give something back. Although most of what I post will have been previously covered elsewhere, there are nonetheless some differences and new lessons to be learned.
I anticipate the following steps, and will post them as I get them completed:
1 - antennas
2 - power
3 - RF decks
4 - control heads
This post covers Step 1: antennas.
Given that this is the seventh F150 I've installed radios in, this step was pretty routine, although it was my first time with the aluminum roof. I should also mention that the other six F150s were XLT models (a mixture of supercab and supercrew) and this one is a Platinum, which is significantly different from the XLT, but not in ways that are important for this step (but will be in later steps).
One difference I immediately noticed was the coat hooks are a bit different than they were in 2014 (the last time I did this). It used to be that you stuck a screwdriver on top of the tab and flipped it down, revealing the torx screw underneath. Now that tab appears to simply pop off and you need to pry at it from the bottom instead of the top. Not a big deal, but it caused some confusion initially. Also, the tab comes completely off, and has to be snapped back in once you are done.
Another VERY important lesson learned has to do with the rear seat dome light assembly. It is clipped on the driver's side and connected to wires on the passenger's side. Whatever you do, do NOT disconnect those wires - you will never get them back together again. The correct procedure is to pull down gently on the driver's side, leaving the passenger's side alone. You want to drop the dome light, but only like a hinge, leaving it dangling from the head liner by the connected wires. Again, if you remove it (as I did), you will never get it hooked back up again because the wire is way too short.
In the interest of full disclosure, I did get it hooked back up, but then again I have extremely long arms. Most people could not reach as far as I could, and even I struggled to do this. I had to stick my arm in from the passenger side above the head liner and reach all the way to the dome light with my right arm holding the wire and connector, using my left arm to reattach the dome light assembly. Not fun. Just trust me on this: do NOT disconnect the dome light from its cable.
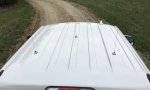
Drilling the holes and installing the NMO mounts was pretty much the same as it ever was. Measure four times and be extra sure of what you are doing. There's no fixing a mistake should you make one. I always put gaffers tape over the spot I'm going to drill, and start out with a pilot hole. I take plenty of time to make sure everything goes exactly according to plan. Of all the steps in an install, drilling is the most critical, so be sure to take extra time to get it right. Some folks might cringe at drilling holes in a $64K truck, but not me. I just made sure I didn't screw up.
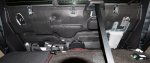
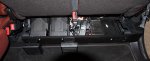
I use a steel snake to fish the coax, which might be more trouble than some would like to go to, but it has always worked for me. I stick the snake in from the hole and work it back to the dome light, then I tape a loose piece of scrap coax to the snake and pull it back out. Then I tape the real coax with the NMO mount attached to the scrap coax, and pull it back through the other way. Once at the dome light, I snake in from the driver's side above the headliner to the dome light, tape my coax to the snake, and pull it from the dome light to the driver's side above the rear door. From there, I feed it manually down the C pillar on the driver's side, making extra sure I clear the side airbags and all the other things that get in the way. You could probably use tape to hold the coax in place if necessary, but I didn't need to.
I pulled down the weather strip from the top center of the rear driver's side door to access the space above the head liner. I also loosened the trim panel that covers the C pillar so I could route the coax down the back corner of the cab. The easiest way to loosen the trim is to tug gently along the door until some of the clips release. The tough one is the top center clip which is very resistant to tugging, but which must come out. I do not remove the trim piece, but merely pull it loose up top. A flashlight helps considerably. I found a small notch at the bottom of the trim piece that was perfect to run the coax through. I also did everything with the rear seat folded down, which is easy to do on the F150 by using a box wrench to snag the pin that releases the seat latch. You can google this in case you've never done it before.
Once all three NMOs were in place and all the cables had been routed, I buttoned everything back up and set about installing the RF connectors. I always use RF Industries RFN-1000-1S N connectors, mostly just out of habit and because I hate crimp connectors (you have to solder the center pin on this one). I do the coax stripping with an xacto knife and spend a lot of time on this in order to get it exactly right without nicking anything, which comes from decades of doing this. I do recall 30 years ago being extremely frustrated when learning how to install N connectors (or BNCs, which I never use and neither should anyone else). It definitely is a skill like any other than you gain with much practice. I'm so old it's pretty much second nature to me, but it still takes time to do right. Don't be in a rush to do anything related to an antenna install.
Overall, installing the antennas was a relatively simple and straightforward task, save for the dome light fiasco which could have been avoided had I known better (another reason for posting that info here). It took me about four hours to do this task, but I took a couple of breaks, and I'm pretty slow because I want to be sure I don't make any mistakes.
Here's the completed product, not that it's very interesting. Next up: providing power for the radios.
I anticipate the following steps, and will post them as I get them completed:
1 - antennas
2 - power
3 - RF decks
4 - control heads
This post covers Step 1: antennas.
Given that this is the seventh F150 I've installed radios in, this step was pretty routine, although it was my first time with the aluminum roof. I should also mention that the other six F150s were XLT models (a mixture of supercab and supercrew) and this one is a Platinum, which is significantly different from the XLT, but not in ways that are important for this step (but will be in later steps).
One difference I immediately noticed was the coat hooks are a bit different than they were in 2014 (the last time I did this). It used to be that you stuck a screwdriver on top of the tab and flipped it down, revealing the torx screw underneath. Now that tab appears to simply pop off and you need to pry at it from the bottom instead of the top. Not a big deal, but it caused some confusion initially. Also, the tab comes completely off, and has to be snapped back in once you are done.
Another VERY important lesson learned has to do with the rear seat dome light assembly. It is clipped on the driver's side and connected to wires on the passenger's side. Whatever you do, do NOT disconnect those wires - you will never get them back together again. The correct procedure is to pull down gently on the driver's side, leaving the passenger's side alone. You want to drop the dome light, but only like a hinge, leaving it dangling from the head liner by the connected wires. Again, if you remove it (as I did), you will never get it hooked back up again because the wire is way too short.
In the interest of full disclosure, I did get it hooked back up, but then again I have extremely long arms. Most people could not reach as far as I could, and even I struggled to do this. I had to stick my arm in from the passenger side above the head liner and reach all the way to the dome light with my right arm holding the wire and connector, using my left arm to reattach the dome light assembly. Not fun. Just trust me on this: do NOT disconnect the dome light from its cable.
Drilling the holes and installing the NMO mounts was pretty much the same as it ever was. Measure four times and be extra sure of what you are doing. There's no fixing a mistake should you make one. I always put gaffers tape over the spot I'm going to drill, and start out with a pilot hole. I take plenty of time to make sure everything goes exactly according to plan. Of all the steps in an install, drilling is the most critical, so be sure to take extra time to get it right. Some folks might cringe at drilling holes in a $64K truck, but not me. I just made sure I didn't screw up.
I use a steel snake to fish the coax, which might be more trouble than some would like to go to, but it has always worked for me. I stick the snake in from the hole and work it back to the dome light, then I tape a loose piece of scrap coax to the snake and pull it back out. Then I tape the real coax with the NMO mount attached to the scrap coax, and pull it back through the other way. Once at the dome light, I snake in from the driver's side above the headliner to the dome light, tape my coax to the snake, and pull it from the dome light to the driver's side above the rear door. From there, I feed it manually down the C pillar on the driver's side, making extra sure I clear the side airbags and all the other things that get in the way. You could probably use tape to hold the coax in place if necessary, but I didn't need to.
I pulled down the weather strip from the top center of the rear driver's side door to access the space above the head liner. I also loosened the trim panel that covers the C pillar so I could route the coax down the back corner of the cab. The easiest way to loosen the trim is to tug gently along the door until some of the clips release. The tough one is the top center clip which is very resistant to tugging, but which must come out. I do not remove the trim piece, but merely pull it loose up top. A flashlight helps considerably. I found a small notch at the bottom of the trim piece that was perfect to run the coax through. I also did everything with the rear seat folded down, which is easy to do on the F150 by using a box wrench to snag the pin that releases the seat latch. You can google this in case you've never done it before.
Once all three NMOs were in place and all the cables had been routed, I buttoned everything back up and set about installing the RF connectors. I always use RF Industries RFN-1000-1S N connectors, mostly just out of habit and because I hate crimp connectors (you have to solder the center pin on this one). I do the coax stripping with an xacto knife and spend a lot of time on this in order to get it exactly right without nicking anything, which comes from decades of doing this. I do recall 30 years ago being extremely frustrated when learning how to install N connectors (or BNCs, which I never use and neither should anyone else). It definitely is a skill like any other than you gain with much practice. I'm so old it's pretty much second nature to me, but it still takes time to do right. Don't be in a rush to do anything related to an antenna install.
Overall, installing the antennas was a relatively simple and straightforward task, save for the dome light fiasco which could have been avoided had I known better (another reason for posting that info here). It took me about four hours to do this task, but I took a couple of breaks, and I'm pretty slow because I want to be sure I don't make any mistakes.
Here's the completed product, not that it's very interesting. Next up: providing power for the radios.