kf4lne
Member
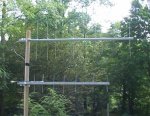
I had a need for a UHF Yagi antenna last night and the only place open to get parts was Wal-Mart For less than $5 I was able to build a very decent 6 element yagi for 450MHz that works well for both transmit on the 70cm amateur band and receives well for most 440-470MHz use. below are pics and materials.
Materials:
10 pack of wire clothes hangers - $0.97
Wooden dowel, 3 feet by 5/8 inch - $1.56
Can of spray paint - $0.99
This list may go up if you need to buy tools or glue.
Additional Materials:
Glue, epoxy, chewing gum or something to hold the elements solid to the boom. I used hi-temp hot glue
Tools:
Drill and bits appropriate for the diameter of wire used
Heavy wire cutters, linemans pliers work best
Howto:
Measurements (In Inches):
Reflector: 13.0
Driven Element: 12.5 inches (SEE NOTES!!!)
Director 1: 12.1 inches or about 12 1/8
Director 2: 11.75 In
Director 3: 11.75 In
Director 4: 10.75 In
Spacing measured from Reflector)
Driven Element: 2.5in
Director 1: 5.5in
Director 2: 11.0in
Director 3: 18.0in
Director 4: 28.5in
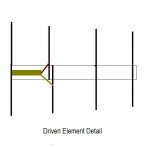
This part requires a steady hand or if you have it a drill press. Clamp the dowel to your work surface and drill as strait as you can the holes for the elements except the driven element. be sure to leave enough room at the back of the antenna to mount it to a pole but so much room that you run out of room before you get to the front of the antenna. 6 inches should be plenty since its 28 inches from reflector to the front director. be sure to drill these holes strait or your antenna will look like crap. Once you have the holes drilled clean up any splinters and roughness you may find. Cut your elements tot he lengths listed above excluding the driven element. The driven element is special and different from the rest of the elements. it is made in two sections. The driven element is a typical half wave dipole so you will need 2 sections. Drill 2 holes for the driven element about 1/8-1/4 inch apart. if your hangers have a rubber coating strip back the coating from the boom ends of the element so you can connect wire to the element. if you have it available use #10 baer copper for the driven element so you can solder to it, but if not you can get by with the steel wire. Cut 2 lengths of wire 7 inches in length and insert into the boom leaving 6 inches of the element exposed on each side of the boom to get the overall 12.5 inch length. You may have to fine tune the elements to get the correct overall length.
You can start inserting your elements into the boom and using your choice of suitable adhesive to secure the elements. Be sure to center the elements so they are even or your antenna will look like crap. Let your adhesive set up before doing any more work to the antenna. once the glue is dry you can attach your coax to the antenna. Attach the shield to one half of the driven element and the center to the other half and using your glue seal the connections and the open end of the coax. if you have it available you can use a 300ohm-75ohm TV antenna balun to connect to the element. you cant solder to steel or aluminum so you will have to seal these connections using epoxy or something similar. Once the glue has cured and you have given the antenna a test run you can paint it. use several coats of a non-conductive paint. i used generic automotive primer. let the paint cure for several hours or all day or whatever works best for the paint you have and find a suitable mounting system and enjoy. The pic is of the UHF yagi and a trial run for a 800MHz yagi.
Materials:
10 pack of wire clothes hangers - $0.97
Wooden dowel, 3 feet by 5/8 inch - $1.56
Can of spray paint - $0.99
This list may go up if you need to buy tools or glue.
Additional Materials:
Glue, epoxy, chewing gum or something to hold the elements solid to the boom. I used hi-temp hot glue
Tools:
Drill and bits appropriate for the diameter of wire used
Heavy wire cutters, linemans pliers work best
Howto:
Measurements (In Inches):
Reflector: 13.0
Driven Element: 12.5 inches (SEE NOTES!!!)
Director 1: 12.1 inches or about 12 1/8
Director 2: 11.75 In
Director 3: 11.75 In
Director 4: 10.75 In
Spacing
Driven Element: 2.5in
Director 1: 5.5in
Director 2: 11.0in
Director 3: 18.0in
Director 4: 28.5in
This part requires a steady hand or if you have it a drill press. Clamp the dowel to your work surface and drill as strait as you can the holes for the elements except the driven element. be sure to leave enough room at the back of the antenna to mount it to a pole but so much room that you run out of room before you get to the front of the antenna. 6 inches should be plenty since its 28 inches from reflector to the front director. be sure to drill these holes strait or your antenna will look like crap. Once you have the holes drilled clean up any splinters and roughness you may find. Cut your elements tot he lengths listed above excluding the driven element. The driven element is special and different from the rest of the elements. it is made in two sections. The driven element is a typical half wave dipole so you will need 2 sections. Drill 2 holes for the driven element about 1/8-1/4 inch apart. if your hangers have a rubber coating strip back the coating from the boom ends of the element so you can connect wire to the element. if you have it available use #10 baer copper for the driven element so you can solder to it, but if not you can get by with the steel wire. Cut 2 lengths of wire 7 inches in length and insert into the boom leaving 6 inches of the element exposed on each side of the boom to get the overall 12.5 inch length. You may have to fine tune the elements to get the correct overall length.
You can start inserting your elements into the boom and using your choice of suitable adhesive to secure the elements. Be sure to center the elements so they are even or your antenna will look like crap. Let your adhesive set up before doing any more work to the antenna. once the glue is dry you can attach your coax to the antenna. Attach the shield to one half of the driven element and the center to the other half and using your glue seal the connections and the open end of the coax. if you have it available you can use a 300ohm-75ohm TV antenna balun to connect to the element. you cant solder to steel or aluminum so you will have to seal these connections using epoxy or something similar. Once the glue has cured and you have given the antenna a test run you can paint it. use several coats of a non-conductive paint. i used generic automotive primer. let the paint cure for several hours or all day or whatever works best for the paint you have and find a suitable mounting system and enjoy. The pic is of the UHF yagi and a trial run for a 800MHz yagi.
Attachments
Last edited:


