2008 Ford Expedition SSV build

Status
Not open for further replies.

avdrummerboy

Member
Joined
Jun 26, 2011
Messages
383
Location
Mohave County, AZ
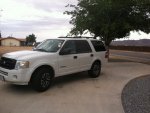
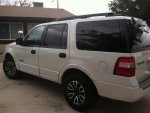
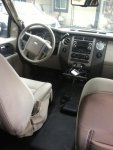
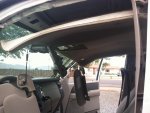
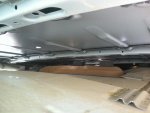
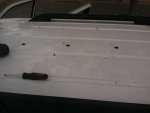
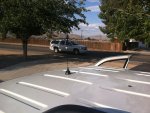
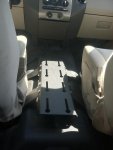
Well, after 5 faithful years, my 2005 Ford Focus has done me well and seen almost 80,000 miles with me. It was a nice setup but I've been looking to upgrade for a while and after A LOT of searching found a great deal, a 2008 Ford Expedition SSV with only 82,000 miles. It was previously used by a fire department locally and sold off at auction. It's a dream come true for a radio install too.

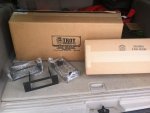
These are three basic photos, I'm hoping to chronicle the buildout on here as it happens. So far, I have the radios that I want in, a Kenwood TK-7180 TK-8180, a Kenwood TM-V71a, and a Uniden BCT15X, maybe more in the future :) I'm going with Troy products and have already ordered faceplates and am now in the process of choosing a console that will work well for what I want.

Hope you all enjoy and any comments, suggestions, questions are welcome!!
 

Attachments

  • IMG_0518.jpg
    IMG_0518.jpg
    62.4 KB · Views: 4,886
  • IMG_0519.jpg
    IMG_0519.jpg
    52.2 KB · Views: 4,043
  • IMG_0520.jpg
    IMG_0520.jpg
    54.3 KB · Views: 4,886

madrabbitt

Member
Feed Provider
Joined
Apr 1, 2004
Messages
746
Location
NM
So existing NMO's in the roof already, or sealed holes at least?
 

vascanner

Member
Joined
May 29, 2012
Messages
59
Location
great ol' Virginy
I used to have a 2008 expedition SSV.....no spotlight, but it was a great vehicle. I really miss it. have a 2013 Tahoe now...which is nice too.
 

PACNWDude

Member
Joined
Oct 15, 2012
Messages
1,347
Wow, must have come from a great department. Barely looks used. And no hack job done on the removal of equipment.

You could put a whole console in between the seat, computer on top an all. Good luck with the build.

Nice starting point though.
 

avdrummerboy

Member
Joined
Jun 26, 2011
Messages
383
Location
Mohave County, AZ
So existing NMO's in the roof already, or sealed holes at least?

Unfortunately no, there is one patch that was spot welded on that used to be where the control cable for the light bar went, and one filled hole on the front right in a place I am not planning on putting an antenna, so it's a blank slate for me with NMO's and antennas, hopefully be punching those in Monday sometime, with pictures to follow of course.

It is a nice blank slate lol, have my console picked out and now have to wait the lead time from troy so hopefully this can all be done in 4-6 weeks!! As Tom Petty said, the waiting is the hardest part! ;)
 

avdrummerboy

Member
Joined
Jun 26, 2011
Messages
383
Location
Mohave County, AZ
Quick update on the install, have the main power cable run through the firewall with 40A fuses at the battery, now still just waiting for my console and faceplates to arrive. Hopefully will drill and install NMO mounts and antennas next week when all the mounts and the hole saw arrives.
 

scottyhetzel

Member
Joined
Nov 3, 2011
Messages
1,409
Location
Palm Springs Area / OrCo
Always run a circuit breaker on the main that way you can reset it...time is priceless . Plus in a pinch your not looking for a fuse...lives depend on it... Feed timer module from ram mounts, set for 1 hour or two... Trigger timer module from ignition source with a fuse...feed output of timer module to spst relay . #30 connects to battery feed... #87 output feeds bluesea fuse block 6/12 fuse type.. #85 is ground...#86 goes to output of ram timer module. Fuse size is 20% higher than load...blade circuit breakers are a plus..

Ground devices on paint free metal...bolt and nut with star washers... Super tight. Upsize ground for great connections...love moles or Phoenix connectors...

Battery>>>circuit breaker>>> timer module and relay feed>>> fuse block >>> devices in car..
 

avdrummerboy

Member
Joined
Jun 26, 2011
Messages
383
Location
Mohave County, AZ
I'm going almost that route. Running the main fused battery connection to a havis chargeguard then splitting to a separate fuse block for accessories and a rigrunner for the radios.
 

avdrummerboy

Member
Joined
Jun 26, 2011
Messages
383
Location
Mohave County, AZ
Update, I now have the power ran and the antennas in place, just waiting on the console and floor plate so that I can put everything in and be done with this finally haha.

Antennas, front to back, are, scanner, 900MHz, 150/450 commercial and county, and 2M/440 ham.
 

Attachments

  • IMG_0539.jpg
    IMG_0539.jpg
    61 KB · Views: 2,895
  • IMG_0540.jpg
    IMG_0540.jpg
    44.7 KB · Views: 2,755
  • IMG_0541.jpg
    IMG_0541.jpg
    30.2 KB · Views: 2,772
  • IMG_0542.jpg
    IMG_0542.jpg
    81.2 KB · Views: 2,769
Last edited:

avdrummerboy

Member
Joined
Jun 26, 2011
Messages
383
Location
Mohave County, AZ
Got the order from Troy in and have it installed, photos are uploading weirdly and slowly but I'll try to get one of the final install sometime today. These two are the order from troy and the floor plate installed in the rig.
 

Attachments

  • IMG_0550.jpg
    IMG_0550.jpg
    54 KB · Views: 2,423
  • IMG_0556.jpg
    IMG_0556.jpg
    41.2 KB · Views: 2,446

firetaz834

Member
Joined
Dec 21, 2007
Messages
323
Location
Metro Area, MI
Looking forward to more photos of your installation. This is since you are using a TROY console, waiting for mine to be delivered.
 

avdrummerboy

Member
Joined
Jun 26, 2011
Messages
383
Location
Mohave County, AZ
Not sure what I'm doing wrong but RR isn't uploading my photo files, so I'll throw them in a photosharing site tomorrow and do it that way, kinda rube goldberg but it works!!
 

firetaz834

Member
Joined
Dec 21, 2007
Messages
323
Location
Metro Area, MI
Could it be the size of your pictures? RR will only accept photo in jpg format of 197kb or smaller (think I have the size correct) But, on the page that you upload your pictures it will give the sizes it accepts. I had that happen on a couple of the pictures I was trying to upload. They seemed like they would not upload and when I checked they were larger than RR would accept. Just a thought
 

03msc

RF is RF
Premium Subscriber
Joined
Jun 3, 2011
Messages
3,972
Location
The Natural State
I'm no expert but is there a reason you mounted the antennas so close together instead of spreading them out more? Maybe it's just the picture but it looks like they are all crowded toward the front half of the roof. Just wondering! I seem to remember posts in other threads about the need for separation of antennas and all that...
 

avdrummerboy

Member
Joined
Jun 26, 2011
Messages
383
Location
Mohave County, AZ
@03msc I could have spread them out more, but in all reality, you have to get antennas 1/4 wavelength apart at least to avoid the worst interactions, there's just not that much room on a vehicle roof. The scanner is the front one and as far away from the ham antenna (the one I'd most likely use on any given day) to avoid destroying the front end. The rest are commercial radios, which are build with rather strong receiver front ends.

@flythenderbird thank you, it was a bit of work but that's where all the fun is for me.
 

richfell

Member
Joined
May 26, 2015
Messages
6
I saw the pictures that you put on flickr too...nice tidy install there, great job! After seeing several installs on this site using the consoles I have to admit they make a great place to put radios and/or faceplates. Enjoy it and 73.
 
Status
Not open for further replies.
Top