
Finally got my patch panel installed!
The kid was out for a couple weeks and we (well, he mostly) took down the wall where my coaxes come down from the attic and we released the tie-downs. We then pulled most of the coaxes and replaced them with newer/better ones. (Some of them were way too long or junk so we replaced them with shorter and better cable types).
In addition to some new networking gear (AP in the ceiling and new router/switch/gateway, all managed) we rearranged some of the antennas in the attic to separate them and make them work with shorter coax runs.
After getting the new coax run we replaced the removed drywall, leaving a space for the coaxes to exit the wall. He then framed the patch panel and mudded the wall. After sanding we installed the patch panel and reassembled the office.
The radio equipment and furniture has not changed from the last pictures (See https://forums.radioreference.com/p...ain-spetember-2017-time-will-last-longer.html) but I reversed the arrangement to accommodate the wife's preferences.
The room will be repainted and re-textured this fall along with the rest of the interior of the house. This will actually be an easy room to take down and put back, the furniture breaks down easily and the radio stuff is pretty easy to put back the way I want it. We just move all the parts to the garage until the paint is dry.
Here are the pics: (Sorry the order of the pics got hosed...)
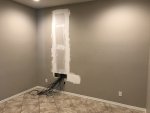
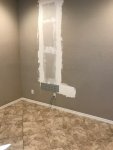
The first picture shows the finished wall before the patch panel is installed.
The second shows the completed wall with the panel after sanding. The wall will be repainted in a few months.
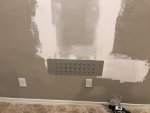
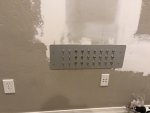
The third shows the panel itself and the fourth a closer view of it. We also added the networking jacks since the router, gateway and modem are to be installed nearby. One jack goes to the Access Point installed in the ceiling in the center of the house, the other jacks lead to the alarm system, the entertainment wall and a future access point location if I need it later.
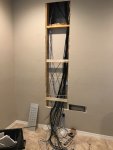
The fifth picture shows the opened wall before the wallboard and panel framing was installed. The panel is mounted with wood screws to the studs. The studs are 20 inches apart and are actually 2x6's since this is a wet wall (laundry room on the other side). The extra depth allowed me to mount the panel flush on the wall instead of having to bump it out to prevent excessive bends in the coax.
The coaxes are RG6QS (for the ST-2's) and a mixture of RG214, RG8X, LMR400 and a few RG58's for the HF stuff.
The kid was out for a couple weeks and we (well, he mostly) took down the wall where my coaxes come down from the attic and we released the tie-downs. We then pulled most of the coaxes and replaced them with newer/better ones. (Some of them were way too long or junk so we replaced them with shorter and better cable types).
In addition to some new networking gear (AP in the ceiling and new router/switch/gateway, all managed) we rearranged some of the antennas in the attic to separate them and make them work with shorter coax runs.
After getting the new coax run we replaced the removed drywall, leaving a space for the coaxes to exit the wall. He then framed the patch panel and mudded the wall. After sanding we installed the patch panel and reassembled the office.
The radio equipment and furniture has not changed from the last pictures (See https://forums.radioreference.com/p...ain-spetember-2017-time-will-last-longer.html) but I reversed the arrangement to accommodate the wife's preferences.
The room will be repainted and re-textured this fall along with the rest of the interior of the house. This will actually be an easy room to take down and put back, the furniture breaks down easily and the radio stuff is pretty easy to put back the way I want it. We just move all the parts to the garage until the paint is dry.
Here are the pics: (Sorry the order of the pics got hosed...)
The first picture shows the finished wall before the patch panel is installed.
The second shows the completed wall with the panel after sanding. The wall will be repainted in a few months.
The third shows the panel itself and the fourth a closer view of it. We also added the networking jacks since the router, gateway and modem are to be installed nearby. One jack goes to the Access Point installed in the ceiling in the center of the house, the other jacks lead to the alarm system, the entertainment wall and a future access point location if I need it later.
The fifth picture shows the opened wall before the wallboard and panel framing was installed. The panel is mounted with wood screws to the studs. The studs are 20 inches apart and are actually 2x6's since this is a wet wall (laundry room on the other side). The extra depth allowed me to mount the panel flush on the wall instead of having to bump it out to prevent excessive bends in the coax.
The coaxes are RG6QS (for the ST-2's) and a mixture of RG214, RG8X, LMR400 and a few RG58's for the HF stuff.
") The other thing is putting casters on the legs of my desk making it easier to pull away from the wall so I can access to the rats nest of wall-warts and power cables.
The other thing is putting casters on the legs of my desk making it easier to pull away from the wall so I can access to the rats nest of wall-warts and power cables.