I looked on the internet for custom installs of ham radios and didn't find any that pertained to me and peaked my interest, so I shot from the hip and after about 2 wks figured out how I was going to do it. This will not be for everyone but, it may help some of you with your install. I respect all comments any of you may have. This is my first post on here so be easy on me.

You are using an out of date browser. It may not display this or other websites correctly.
You should upgrade or use an alternative browser.
You should upgrade or use an alternative browser.
2011 F150 Kenwood TM 742a 2m/220/440 Ham Radio Install
- Thread starter KF4FWF
- Start date
- Status
- Not open for further replies.
ERICMYERS
Member
I'm about to do a 2010 F150 SuperCrew Lariat w/ a 2 Meter, a BCD996T, and a Cobra 29. This truck is a challenge for installing radios! Looking forward to seeing what you do. I'll be posting my install along the way, as there is VERY little out there w/r/t radio installs for these trucks.
Cheers,
Eric
Cheers,
Eric
2011 f150 Ham Radio Install
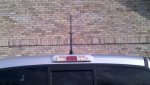
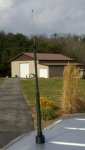
The first pics are of the truck with an NMO mount Austin 1/4 wave triband 2m/220/440 antenna. It is approximately 18" tall. This is my first experience with this antenna. I am not sure if I like it or not. I previously used the Comet triband with a fold over hinge. The Comet is approximately 37" tall but, it has more gain. Depending on whether you live in flat terrain or hilly or mountainous terrain will decide which may be best suited for your particular application.
The first pics are of the truck with an NMO mount Austin 1/4 wave triband 2m/220/440 antenna. It is approximately 18" tall. This is my first experience with this antenna. I am not sure if I like it or not. I previously used the Comet triband with a fold over hinge. The Comet is approximately 37" tall but, it has more gain. Depending on whether you live in flat terrain or hilly or mountainous terrain will decide which may be best suited for your particular application.
Attachments

2011 f150 Ham Radio Install
I didn't want an easy install. It took about 10 hrs total to do the install. It probably would have taken 4 or 5 if I knew what I was doing. I wanted a "Stealth Type" if you may, install. I didn't want a tangled up mess of wires or a bunch of this and that hanging everywhere and bolted to the floor, etc. I wanted an install that when you took someone with you, they might not even notice you have a radio.
You can unplug the mic and put it in the console and flip the sunglass holder up and just unscrew the antenna on top and it will practically be invisible. I know you can't use the radio without the antenna but, I was thinking of the possibility of someone stealing the radio. This has happened before and this radio is not cheap.
I opted for the radio install behind the back seat on the passenger side. You have to raise the bottom seat and then remove the headrest. The seat back then tilts forward slightly so you can look down in behind the seat.Only then can you see what you need to see in order to pull the top seat down. There is a pin facing the passenger side that I used a boxed end wrench to pull up and then the seat comes down.
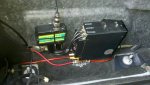
I then removed the grey insulation material from the back of the cab so I could see what was back there. I didnt want to screw through any wires, air bag controllers, etc. I located it in the spot that is in because it was clear for me to use. I didn't cut a big square out of the insulation. I mounted the bracket to the steel and then pressed the insulation against it and then sliced two slits with a razor blade.
I removed all of the rubber weather seal on both doors on the passenger side. I then removed the bottom sill plates. They just pop up. You will need a 1 1/2 putty knife or I am sure there is a tool for this but, I didn't have one. A thin flat screwdriver may stress the plastic. This will open up the wiring channel the the factory uses. I ran all of my wires (10 guage power to battery, remote plug for mic, remote for radio control head, and 3 strand external speaker wire to control all 3 radio's volume independently.
I didn't want an easy install. It took about 10 hrs total to do the install. It probably would have taken 4 or 5 if I knew what I was doing. I wanted a "Stealth Type" if you may, install. I didn't want a tangled up mess of wires or a bunch of this and that hanging everywhere and bolted to the floor, etc. I wanted an install that when you took someone with you, they might not even notice you have a radio.
You can unplug the mic and put it in the console and flip the sunglass holder up and just unscrew the antenna on top and it will practically be invisible. I know you can't use the radio without the antenna but, I was thinking of the possibility of someone stealing the radio. This has happened before and this radio is not cheap.
I opted for the radio install behind the back seat on the passenger side. You have to raise the bottom seat and then remove the headrest. The seat back then tilts forward slightly so you can look down in behind the seat.Only then can you see what you need to see in order to pull the top seat down. There is a pin facing the passenger side that I used a boxed end wrench to pull up and then the seat comes down.
I then removed the grey insulation material from the back of the cab so I could see what was back there. I didnt want to screw through any wires, air bag controllers, etc. I located it in the spot that is in because it was clear for me to use. I didn't cut a big square out of the insulation. I mounted the bracket to the steel and then pressed the insulation against it and then sliced two slits with a razor blade.
I removed all of the rubber weather seal on both doors on the passenger side. I then removed the bottom sill plates. They just pop up. You will need a 1 1/2 putty knife or I am sure there is a tool for this but, I didn't have one. A thin flat screwdriver may stress the plastic. This will open up the wiring channel the the factory uses. I ran all of my wires (10 guage power to battery, remote plug for mic, remote for radio control head, and 3 strand external speaker wire to control all 3 radio's volume independently.
Attachments
Guys, I have a 2011 F-150 XLT Super Crew. I specifically ordered it with bucket seats rather than the 40/20/40 bench seat. However, from what I've learned of the way the console or center seat are attached, it really doesn't matter. On the other hand, if you have a higher trim level that has the flow-through console with the console shifter, you do have bigger challenges on your hands.
At this time, I have a Jotto Desk Lazy-L console mounted in my truck. It is attached to a Jotto Desk floor plate which is attached to the OEM console mounting frame which is then attached to the floor of the truck. I also have a RAM computer mount which is attached to the passenger seat bolts.
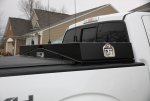
My antennas are mounted to a Highway Products cross-bed tool box. Also mounted in the box is an Optima yellow-top battery. The battery is charged from the OEM trailer battery charging circuit and all radios run from this battery. Power and antenna cables pass through the front wall of the bed into the vents in the back wall of the cab.
My project isn't anywhere near done, but it's getting there.
At this time, I have a Jotto Desk Lazy-L console mounted in my truck. It is attached to a Jotto Desk floor plate which is attached to the OEM console mounting frame which is then attached to the floor of the truck. I also have a RAM computer mount which is attached to the passenger seat bolts.
My antennas are mounted to a Highway Products cross-bed tool box. Also mounted in the box is an Optima yellow-top battery. The battery is charged from the OEM trailer battery charging circuit and all radios run from this battery. Power and antenna cables pass through the front wall of the bed into the vents in the back wall of the cab.
My project isn't anywhere near done, but it's getting there.
I haven't done any radio installs, but, worked with my roommate to install a bunch of things on his 2010 Platinum. At first I thought it was going to be a pain, however, it turned out to be much easier than what I thought.
It's still a pain if you want to install 5 radios or something of that size, but I personally found it much easier to work with than my TrailBlazer (I required assistance from a bottle jack to remove the 1-piece console in order to do it by myself)
It's still a pain if you want to install 5 radios or something of that size, but I personally found it much easier to work with than my TrailBlazer (I required assistance from a bottle jack to remove the 1-piece console in order to do it by myself)
ERICMYERS
Member
Guys, I have a 2011 F-150 XLT Super Crew. I specifically ordered it with bucket seats rather than the 40/20/40 bench seat. However, from what I've learned of the way the console or center seat are attached, it really doesn't matter. On the other hand, if you have a higher trim level that has the flow-through console with the console shifter, you do have bigger challenges on your hands.
Mine is a Lariat w/ flow thru console which is not radio friendly at all, but a darn nice truck! - basically, I decided that I have 2 options - mount radios in the console armrest bin (clean, but functionally a challenge), or overhead, which is what I've decided to do. I'm using a substantially modified VDP Shelf-It for a Super Duty (contrary to JC Whitney info, this does NOT fit an F150 straight out of the box - brackets are not compatible as shipped, and VDP will not have brackets for the f150 until "maybe" later this year), So, I've custom fabbed brackets. It's still in mock up stage, but I'm liking it so far.
My antennas are mounted to a Highway Products cross-bed tool box. Also mounted in the box is an Optima yellow-top battery. The battery is charged from the OEM trailer battery charging circuit and all radios run from this battery. Power and antenna cables pass through the front wall of the bed into the vents in the back wall of the cab..
Got any photos of the toolbox setup and wiring for that? Interesting idea - why did you choose that strategy of a second battery running off trailer circuit? See any advantages? How do the antennas perform mounted there? I'm thinking of doing that for antenna placement as well, for at least 2 of mine. Parking in the garage is important to me, so clearance precludes roof mounting - stake pocket mounts would be a possibility, but also a challenge on the 5.5 bed (to make it look nice) and seriously restrict tonneau options...like we said, this truck is challenging!
donny612
Member
Guys, I have a 2011 F-150 XLT Super Crew. I specifically ordered it with bucket seats rather than the 40/20/40 bench seat. However, from what I've learned of the way the console or center seat are attached, it really doesn't matter. On the other hand, if you have a higher trim level that has the flow-through console with the console shifter, you do have bigger challenges on your hands.
At this time, I have a Jotto Desk Lazy-L console mounted in my truck. It is attached to a Jotto Desk floor plate which is attached to the OEM console mounting frame which is then attached to the floor of the truck. I also have a RAM computer mount which is attached to the passenger seat bolts.
My antennas are mounted to a Highway Products cross-bed tool box. Also mounted in the box is an Optima yellow-top battery. The battery is charged from the OEM trailer battery charging circuit and all radios run from this battery. Power and antenna cables pass through the front wall of the bed into the vents in the back wall of the cab.
My project isn't anywhere near done, but it's getting there.
Pictures????
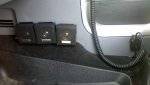
Attached is a photo of the antennas mounted on the toolbox. On the sides are Larsen NMO2/70B antennas attached to the lids of the toolbox. In the center is a Larsen NMO50B which is attached to the box.Got any photos of the toolbox setup and wiring for that? Interesting idea - why did you choose that strategy of a second battery running off trailer circuit? See any advantages? How do the antennas perform mounted there?
I really wanted to isolate the radios from the vehicle electrical system as much as possible. By using an auxiliary battery, the radios pull power from the battery rather than the truck. I have no noise problems and the radios stay powered up when I start the vehicle.
I tapped into the OEM trailer battery charge circuit which is controlled by a relay in the underhood fuse box. That relay is only energized when the engine is running, so I have no worries about discharging the vehicle's battery when the engine is off. My install in the Ford Expedition that preceded this F-150 would sometimes result in a dead starting battery. That won't happen now.
The performance of the antennas is not 100%. I tried to lay out the spacing so the antennas were more than 19" (roughly a quarter wave on 2m) from the cab and from each other. But I'm sure I have some pattern issues. I also need to improve the grounding of the toolbox.
As for the stake pocket mounts, read the information about Ford F-150s on the Geotool web site very carefully. It sounds like his mounts will work on an F-150, but you gotta jump through some hoops.
Attachments
ERICMYERS
Member
K4FWF - classy job on that install. Super clean and well thought out. Reminds me of the stealth install I did on my Accord - 30 seconds and nobody knows you've got a radio.
If that's a radar detector coil wire hanging over your mirror, you definitely have to look into buying (or making one like I did) an invisible cord to power it off taps in the back of the mirror.
If that's a radar detector coil wire hanging over your mirror, you definitely have to look into buying (or making one like I did) an invisible cord to power it off taps in the back of the mirror.
ERICMYERS
Member
Attached is a photo of the antennas mounted on the toolbox. On the sides are Larsen NMO2/70B antennas attached to the lids of the toolbox. In the center is a Larsen NMO50B which is attached to the box.
I really wanted to isolate the radios from the vehicle electrical system as much as possible. By using an auxiliary battery, the radios pull power from the battery rather than the truck. I have no noise problems and the radios stay powered up when I start the vehicle.
W9RXR - my hat is off to you. You have executed your truck's antennas/bed quite exactly how I've been planning mine. Was just at a hamfest this weekend, and could find nothing like this idea - finally another example to work from! That is one seriously nice, albeit seriously spendy, toolbox! Gullwing makes it possible to open w/o removing the whips. The dimple design allows for good mounting of NMO's where diamondplate really does not. Doing a toolbox AND a tonneau is nice - I assume it's a custom Extang?
I tapped into the OEM trailer battery charge circuit which is controlled by a relay in the underhood fuse box. That relay is only energized when the engine is running, so I have no worries about discharging the vehicle's battery when the engine is off. My install in the Ford Expedition that preceded this F-150 would sometimes result in a dead starting battery. That won't happen now.
Did you tap back at the connector, or in the middle of the run somewhere? Fed up through the front box vents? Nice idea for isolation, and depending on where you mounted the radios, possibly shorter runs for power. Certainly a well executed and well considered 1 off install, Robert!
The performance of the antennas is not 100%. I tried to lay out the spacing so the antennas were more than 19" (roughly a quarter wave on 2m) from the cab and from each other. But I'm sure I have some pattern issues. I also need to improve the grounding of the toolbox.
Any antenna setup is a tradeoff, right?!
As for the stake pocket mounts, read the information about Ford F-150s on the Geotool web site very carefully. It sounds like his mounts will work on an F-150, but you gotta jump through some hoops.
I kind of like the idea/look of twin whips in the rear stakes, but to be honest, I think it's asking for vandalism by being so high profile. It's a more clear line of sight, but not as good of a ground plane location...seems just not as clean of a design, I guess.
Would you mind showing off the inside of your toolbox, and also how you've done your radios in the cab? If it's done as professionally as Jim's, (and one can only assume it is) this has developed into a seriously high class install thread, and I'm going to have to up my game plan a bit!
And, I can stand flat-footed at the side of the truck, open the gull wings, and reach into the tool box. Most other boxes wouldn't work out that way for me.Gullwing makes it possible to open w/o removing the whips.
Yes, it does. I remember asking the customer service guy at Highway Products about the diameter of the dimples and the distance between them. I'm sure he thought those were odd questions to ask.The dimple design allows for good mounting of NMO's where diamondplate really does not.
No, a Truxedo Lo Pro. Truxedo was the only tonneau I could find that would make a custom size for me. But, I'm not happy with the sealing--I didn't expect the bed to be water tight...and it's not. As much as I like the look, I think I might have been better off with a fiberglass camper shell from Leer or ARE.Doing a toolbox AND a tonneau is nice - I assume it's a custom Extang?
The wiring harness that carries the trailer wiring runs down the left frame rail. I cut into it near the gap between cab and bed. Ran the positive wire straight up and through a hole in the front wall of the bed and then into the box.Did you tap back at the connector, or in the middle of the run somewhere?
That's all still a work in progress. Once the weather warms up in the spring, I have several things to finish before I show it off.Would you mind showing off the inside of your toolbox, and also how you've done your radios in the cab?
mmckenna
I ♥ Ø
Here's the install for my 2011 F150. XLT, SuperCrew:
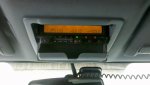
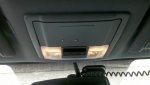
CDM-1550ls head mounted under the dash. The RF deck is behind the rear seat, similar to KF4FWF's install. Install not yet complete in this picture.

Antenna is mounted smack in the center of the roof. NMO with a plain old 1/4 wave for VHF. Again, install not yet complete in this picture.

Since those photos were taken I replaced the stock CDM mic with the heavy duty mic. I also added an external speaker to give a bit more sound.
Glad to see some other nice installs on these trucks. It isn't always easy, but it sure looks good when you take your time and do it right. Really makes me sick to see some of the hack jobs people do to their vehicles. I guess I just enjoy the install process. Not enough to do it full time, But enough that I enjoy doing it now and then.
CDM-1550ls head mounted under the dash. The RF deck is behind the rear seat, similar to KF4FWF's install. Install not yet complete in this picture.
Antenna is mounted smack in the center of the roof. NMO with a plain old 1/4 wave for VHF. Again, install not yet complete in this picture.
Since those photos were taken I replaced the stock CDM mic with the heavy duty mic. I also added an external speaker to give a bit more sound.
Glad to see some other nice installs on these trucks. It isn't always easy, but it sure looks good when you take your time and do it right. Really makes me sick to see some of the hack jobs people do to their vehicles. I guess I just enjoy the install process. Not enough to do it full time, But enough that I enjoy doing it now and then.
Last edited:
KaiserM715
Member
I will be installing a radio in a 2010 F-150 with a center console and have a couple of questions on ya'lls installs.
How did you mount your external speakers to the lower portion of the center console?
Thanks for the info!!
I didn't want an easy install. It took about 10 hrs total to do the install. It probably would have taken 4 or 5 if I knew what I was doing. I wanted a "Stealth Type" if you may, install. I didn't want a tangled up mess of wires or a bunch of this and that hanging everywhere and bolted to the floor, etc. I wanted an install that when you took someone with you, they might not even notice you have a radio.
How did you mount your external speakers to the lower portion of the center console?
Do you have a pic that shows where this connection is made? Are you getting your power from this location, or using a relay to control power directly from the battery?I tapped into the OEM trailer battery charge circuit which is controlled by a relay in the underhood fuse box. That relay is only energized when the engine is running, so I have no worries about discharging the vehicle's battery when the engine is off. My install in the Ford Expedition that preceded this F-150 would sometimes result in a dead starting battery. That won't happen now.
Thanks for the info!!
I have a close-up of where I spliced into the wiring harness, but you really can't tell much about the "where" from this photo. My truck is a SuperCrew with a 5.5 foot bed. There is a wiring harness that runs along the inside of the driver's side frame rail. One of the wires in that harness is the trailer battery charge circuit to the 7-pin trailer connector. I opened up that wiring harness near the split between the cab and the bed so I could tap into that circuit.Do you have a pic that shows where this connection is made?
If you bought your truck new, there should have been a plastic bag in the cab with a fuse and a relay for the trailer battery charger circuit. They go in the fuse block that on top of the radiator. When the engine is running, that relay is energized. When the engine is not running, that relay is de-energized. I am taking the feed from that circuit to charge an Optima yellow-top battery that is mounted in the cross-bed box. I then have a fused line coming from that battery that I use to run my radios. I have plenty of capacity to run my radios from that battery and the vehicle's alternator keeps that battery charged. When I shut the engine off, the battery is not connected to the vehicle's electrical system so I don't have to worry about my radios discharging the vehicle's starting battery.Are you getting your power from this location, or using a relay to control power directly from the battery?
W5KVV
Member
Clean install & I love the tribander.
I would love to find a Kenwood tribander, but they go for an arm & a leg!!
I would love to find a Kenwood tribander, but they go for an arm & a leg!!
- Status
- Not open for further replies.
Similar threads
- Replies
- 42
- Views
- 9K
- Locked
- Replies
- 31
- Views
- 5K
- Replies
- 66
- Views
- 22K
- Replies
- 23
- Views
- 9K
- Replies
- 21
- Views
- 10K