
I've mentioned a few times that I've recently done an installation in my new to me 2017 Toyota Rav 4 so I thought it would be time to post.
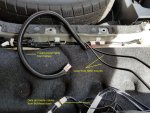
The first order of business was to install power cables. These are routed from the battery, through the firewall, and under the two passenger trim kick thresholds until they arrive behind the rear seats ahead of the cargo compartment.

The next order of business was to remove part of the dash to install remote data and audio cables between a blank portion of the dash, under the center console and to the distribution point behind the rear seats and in front of the cargo compartment. As luck would have it there are some flip up panels behind the rear seats and in front of the cargo compartment that reveal a space where I chose to install all of my rear wiring.
Below are photos of the new face plate that now allows removal without pulling any other dash components along with two CAT 6 bulkhead connectors and two 1/8" phone jacks.

All of the cabling is directed to the space behind the rear seats under some flip up covers. Note the Power Pole distribution junction. This allows for a quick disconnect of the power and room to add a few addition devices.

Next on the to do list was installing antenna mounts. With the roof liner down, I installed two Larsen standard NMO mounts. The rear one will be used for the current radio and the forward one will be available for future use. As I'd never worked on a RAV 4 before, pulling the headliner was the most difficult and time consuming part. Not that it was difficult per se, but I wanted to get an eye on all of the wiring, roof struts and airbags so that I could mount and route properly.

Below are the finished mounts and antenna. The forward mount is capped and the rear has a Tram 1/4 wave 2M/70cm antenna. I'm not particularly a fan of Tram but since I operate in both ham and GMRS bands, I needed an antenna that was capable of both. SWR across all bands range from 1.1: 1 to 1.7:1. A compromise I know but It'll do until I find a better one. Or worse case, I have to buy a new antenna every year or so.

The radio mount is of my own making. It is made of aluminum and is cut to fit directly into the lone storage hole in the center console.

Here is the radio base mounted to a cross member of the rear seat. The radio base is mounted to it's stock mounting bracket that is in turn, mounted to the rear seat cross member. With the seat down and the cover panels up, I can connect the programming cable for codeplug changes.

Here is the radio. A Connect Systems CS800D dual band part 90 radio.
Below is the speaker sitting between the radio mount and the dash. While it fits nicely there, I'm not sure if that will be its final home.

With everything installed and car parked, I complete the final step of the installation. I indulge in a bit of the local brewery's wares.

The first order of business was to install power cables. These are routed from the battery, through the firewall, and under the two passenger trim kick thresholds until they arrive behind the rear seats ahead of the cargo compartment.
The next order of business was to remove part of the dash to install remote data and audio cables between a blank portion of the dash, under the center console and to the distribution point behind the rear seats and in front of the cargo compartment. As luck would have it there are some flip up panels behind the rear seats and in front of the cargo compartment that reveal a space where I chose to install all of my rear wiring.
Below are photos of the new face plate that now allows removal without pulling any other dash components along with two CAT 6 bulkhead connectors and two 1/8" phone jacks.
All of the cabling is directed to the space behind the rear seats under some flip up covers. Note the Power Pole distribution junction. This allows for a quick disconnect of the power and room to add a few addition devices.
Next on the to do list was installing antenna mounts. With the roof liner down, I installed two Larsen standard NMO mounts. The rear one will be used for the current radio and the forward one will be available for future use. As I'd never worked on a RAV 4 before, pulling the headliner was the most difficult and time consuming part. Not that it was difficult per se, but I wanted to get an eye on all of the wiring, roof struts and airbags so that I could mount and route properly.
Below are the finished mounts and antenna. The forward mount is capped and the rear has a Tram 1/4 wave 2M/70cm antenna. I'm not particularly a fan of Tram but since I operate in both ham and GMRS bands, I needed an antenna that was capable of both. SWR across all bands range from 1.1: 1 to 1.7:1. A compromise I know but It'll do until I find a better one. Or worse case, I have to buy a new antenna every year or so.
The radio mount is of my own making. It is made of aluminum and is cut to fit directly into the lone storage hole in the center console.
Here is the radio base mounted to a cross member of the rear seat. The radio base is mounted to it's stock mounting bracket that is in turn, mounted to the rear seat cross member. With the seat down and the cover panels up, I can connect the programming cable for codeplug changes.
Here is the radio. A Connect Systems CS800D dual band part 90 radio.
Below is the speaker sitting between the radio mount and the dash. While it fits nicely there, I'm not sure if that will be its final home.
With everything installed and car parked, I complete the final step of the installation. I indulge in a bit of the local brewery's wares.

") .
.