
- Joined
- Feb 21, 2003
- Messages
- 374
<From this months Scannerfood.com Newsletter
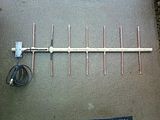
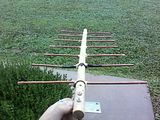
Homemade $15.00 450 MHz Yagi (~ 10dB Gain)
Remember the higher the frequency the more difficult it becomes to get the signal from the antenna to the receiver. In our case we needed something with more gain for the UHF business and public safety band.
With a lot of your unknowns being in this range, a directional antenna is just what we need.
Commercially available Yagi's in this range vary from $40 to over a hundred bucks!
With ten foot of the copper tubing costing less than nine dollars and already having everything else we needed this should be an easy build. Here are some tips.
Shopping List

Dry-wall Hanger Plug
 Driven Element Electrical
We don't plan on using this antenna for transmitting so the SWR (standing wave ratio) is not really a big concern, neither is matching the antenna. While this can increase reception capabilities we simply are attaching the shield and center of the coax to each end of the driven elements respectively. While copper tubing can be fun to solder to, 1/4" is usually managable with a very hot iron. Drilling a very small hole in the element just a few cm out from the blue plugs above make soldering the coax leads much easier. To finish things up we drilled an additional hole in the boom before soldering the leads to route the coax back through the boom for strength. We also used some heat shrink tubing and glue to further the reinforcements. While the elements are not perfectly straight it'll do for now, when I get a feeling of OCD'ness Ill have it perfect.
 Click for larger
Homemade $15.00 450 MHz Yagi (~ 10dB Gain)
Remember the higher the frequency the more difficult it becomes to get the signal from the antenna to the receiver. In our case we needed something with more gain for the UHF business and public safety band.
With a lot of your unknowns being in this range, a directional antenna is just what we need.
Commercially available Yagi's in this range vary from $40 to over a hundred bucks!
With ten foot of the copper tubing costing less than nine dollars and already having everything else we needed this should be an easy build. Here are some tips.
Shopping List
- 10 ft - 1/4'' copper coil tubing
- 7/8 " Wooden dowel rod (>30")
- Gorilla Glue (multi-purpose foaming)
- Metal mending plate 1 1/2" x 3 1/2"
- 2 Bolts (matching dimensions)
- 2 Lock Nuts(matching dimensions)
- 2 Nuts(matching dimensions)
- Coax
- Coaxial connector
- 2 or 3 Nylon Ties
- 1/4" Plastic Drywall Screw Expander x2
- Heat Shrink Tubing or Electrical Tape
- 5/16" Drill Bit
- Drill
- Soldering Iron
- Wrench/Pliers
- Measuring Tape
- Pipe Cutter
- String or Vice
Dimensions 450 MHz
Reflector13 7/32"
Driven Element 6 1/2"
Each Side Directors11 7/32"
Spacing 4 15/16"
Driven Element 6 1/2"
Each Side Directors11 7/32"
Spacing 4 15/16"
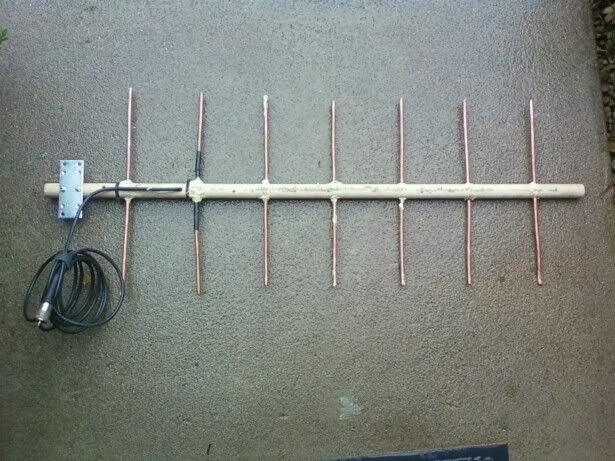
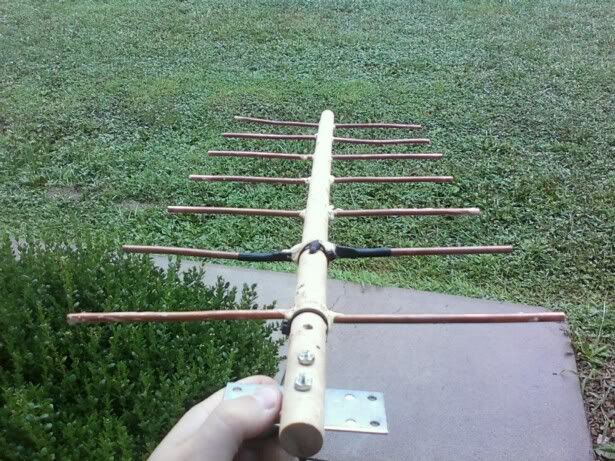
Having a drill press makes drilling the holes much easier, also the use of a vice would make the process much easier...hrm maybe I need Santa to bring me a nice one. First, I measured out the hole placement and since I had enough tubing I decided to make it a 7 element. The number of director elements only increases gain and boom weight! If you decide to get exotic and have lots of elements don't over stress your boom, they can get heavy with lots of elements. Since I didn't have a vice I drilled the first hole (this would be the director element). I left enough room on the end to attach the mounting bracket or to leave room to use a handle for handheld use. I then inserted a 5/16'' wooden dowel I had to use a guide for drilling the remaining holes straight. Using a string like a plumb bob works as well.
Directors and Reflector
I Drilled the holes and cut my tubing with a pipe cutter, its convenient to straighten the tubing as your cutting versus waiting till after its cut. Remember you can always fine tune it after its assembled since the copper tubing is flexible. Using some Q-Tips I moistened the inside of the holes and then used my 5/16" dowel to slap on Gorilla Glue. Inserted each piece of copper tubing until centered. Using the glue dowel I marked center to make measuring each side of the boom easier.
I Drilled the holes and cut my tubing with a pipe cutter, its convenient to straighten the tubing as your cutting versus waiting till after its cut. Remember you can always fine tune it after its assembled since the copper tubing is flexible. Using some Q-Tips I moistened the inside of the holes and then used my 5/16" dowel to slap on Gorilla Glue. Inserted each piece of copper tubing until centered. Using the glue dowel I marked center to make measuring each side of the boom easier.
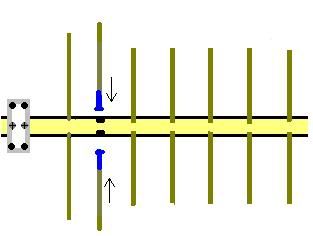
Driven Element
The driven element is basically a director cut in half, each end has a plastic dry-wall expanding screw plug slipped inside the copper tubing. This is to insulate either side from making contact once both have been slipped inside the dowel rod as pictured below. It's important to not increase the length of the driven elements more than a few millimeters, if they are longer than the reflector the antenna looses its ability to be directional. The directors and reflector are solid lengths all the way through the boom.
The driven element is basically a director cut in half, each end has a plastic dry-wall expanding screw plug slipped inside the copper tubing. This is to insulate either side from making contact once both have been slipped inside the dowel rod as pictured below. It's important to not increase the length of the driven elements more than a few millimeters, if they are longer than the reflector the antenna looses its ability to be directional. The directors and reflector are solid lengths all the way through the boom.
Dry-wall Hanger Plug
We don't plan on using this antenna for transmitting so the SWR (standing wave ratio) is not really a big concern, neither is matching the antenna. While this can increase reception capabilities we simply are attaching the shield and center of the coax to each end of the driven elements respectively. While copper tubing can be fun to solder to, 1/4" is usually managable with a very hot iron. Drilling a very small hole in the element just a few cm out from the blue plugs above make soldering the coax leads much easier. To finish things up we drilled an additional hole in the boom before soldering the leads to route the coax back through the boom for strength. We also used some heat shrink tubing and glue to further the reinforcements. While the elements are not perfectly straight it'll do for now, when I get a feeling of OCD'ness Ill have it perfect.
 Click for larger
Last edited: