
jeremyzone
Member
The Sentinel software can be a pain to modify large chunks of data. The following steps can be used to easily modify the information using Microsoft Excel.
After using Unitrunker to monitor my local trunked radio system, I found that the radio ID's (RIDs) were allocated in blocks by agency or department. I was looking for a way to tag ranges of radio ID's but the Uniden Sentinel software requires you to plug in the RIDs one at a time. Similarly, if you wanted to change alert values on a big chunk of RID's, it might be faster to modify the information using Excel using the below steps. Some third-party software solutions like Butel Arcpatrol may offer a more user friendly interface but I don't believe they allow you to use formulas and other fancy stuff like the real Excel. Plus they cost money!
Here is a series of steps to manage RID's in Excel. Using Excel, you can perform a wide variety of modifications to your radio IDs. This morning, I used these steps to add tags for 5k RIDs.
1. Find the right Favorites List .hpd file and open using Notepad
Navigate to your \Documents\Uniden\BCDx36HP\ folder
Each Favorites List is saved as a separate file using the format f_0000xx.hpd. If you have a lot of Favorites Lists, it is easy to find the right one by opening the f_list.cfg file using Notepad to associate the name along with file name for the .hpd file you want to open.
Make a backup of this .hpd file in case you accidentally screw up the file in later steps!!
2. Find the section of the file dealing with RID's by looking for the lines starting with "UnitIds"
These lines started on line 5 of my file. Each RID has its own line.
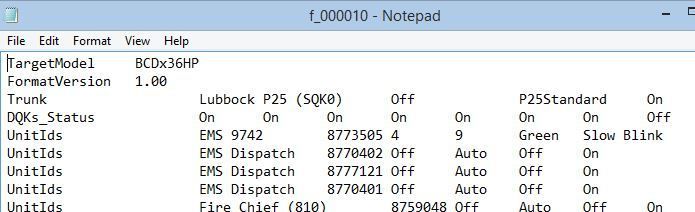
(If you don't have any RIDs saved on this Favorites List, then it is probably a good idea to open Sentinel, add a RID using the Favorites List Editor, save the Favorites List, and reopen the .hpd file. That way, you will have the correct format and location of the UnitIds lines)
Select all the "UnitIds" lines and copy them.
3. Open a new Excel document and paste. Use Excel to add or modify your RIDs
The structure of the tab-delimited UnitIds lines will now be easier to see in the spreadsheet view of Excel.
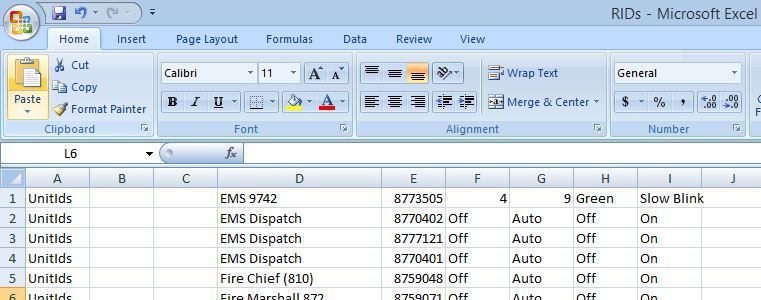
Most of the fields are self-explanatory, but here goes an explanation anyway:
The first field (column A in Excel) should always be "UnitIds"
The second field (column B) is blank (will be interpreted as a tab later)
The third field (column C) is also blank
The fourth field (column D) is the tag you'd like to display on your scanner (called Unit ID Name in Sentinel)
The fifth field (column E) is the RID itself (called Unit ID in Sentinel)
The sixth field (column F) is Alert Tone (acceptable values are "Off" or numbers "1-9")
The seventh field (column G) is the Alert Tone Volume (acceptable values are "Auto" or numbers "1-15")
The eighth field (column H) is the Alert Light Color (acceptable values are "Off", "Blue", "Red", "Magenta", "Green", "Cyan", "Yellow", or "White")
The ninth field (column I) is the Alert Light Pattern (acceptable values are "On", "Slow Blink", or "Fast Blink")
You may now use Excel to modify these fields. Since the radio shop for my city assigns RIDs in blocks, I added all the RIDs for the block. I also wanted to still be able to uniquely ID each tag so I can go back and add more info to the tag later. Therefore, I added the last 5 digits of the RID to the name using the Excel RIGHT formula.
Here's an example:

I also had a few duplicates. I cleaned them up by highlighting the RID column, selecting "Conditional Formatting">"Highlight cell rules">"Duplicate Values", then manually scrolling through the list to eliminate duplicates.
4. When done in Excel, use "Save as..">"Other Formats">"Text (tab delimited)"
Save the RIDs using a file name you will remember
(These exact steps apply to Excel 2007 in Windows, but similar options can be found on other Excel versions)
5. Open the .txt file you just created in Excel using Notepad, copy and paste the UnitIds lines to replace the UnitIds lines in the f_0000xx.hpd file identified in Step 1, and save the .hpd file
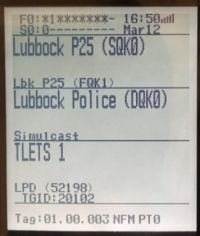
If you were successful, you should see all your RIDs when you reopen Sentinel
After using Unitrunker to monitor my local trunked radio system, I found that the radio ID's (RIDs) were allocated in blocks by agency or department. I was looking for a way to tag ranges of radio ID's but the Uniden Sentinel software requires you to plug in the RIDs one at a time. Similarly, if you wanted to change alert values on a big chunk of RID's, it might be faster to modify the information using Excel using the below steps. Some third-party software solutions like Butel Arcpatrol may offer a more user friendly interface but I don't believe they allow you to use formulas and other fancy stuff like the real Excel. Plus they cost money!
Here is a series of steps to manage RID's in Excel. Using Excel, you can perform a wide variety of modifications to your radio IDs. This morning, I used these steps to add tags for 5k RIDs.
1. Find the right Favorites List .hpd file and open using Notepad
Navigate to your \Documents\Uniden\BCDx36HP\ folder
Each Favorites List is saved as a separate file using the format f_0000xx.hpd. If you have a lot of Favorites Lists, it is easy to find the right one by opening the f_list.cfg file using Notepad to associate the name along with file name for the .hpd file you want to open.
Make a backup of this .hpd file in case you accidentally screw up the file in later steps!!
2. Find the section of the file dealing with RID's by looking for the lines starting with "UnitIds"
These lines started on line 5 of my file. Each RID has its own line.

(If you don't have any RIDs saved on this Favorites List, then it is probably a good idea to open Sentinel, add a RID using the Favorites List Editor, save the Favorites List, and reopen the .hpd file. That way, you will have the correct format and location of the UnitIds lines)
Select all the "UnitIds" lines and copy them.
3. Open a new Excel document and paste. Use Excel to add or modify your RIDs
The structure of the tab-delimited UnitIds lines will now be easier to see in the spreadsheet view of Excel.

Most of the fields are self-explanatory, but here goes an explanation anyway:
The first field (column A in Excel) should always be "UnitIds"
The second field (column B) is blank (will be interpreted as a tab later)
The third field (column C) is also blank
The fourth field (column D) is the tag you'd like to display on your scanner (called Unit ID Name in Sentinel)
The fifth field (column E) is the RID itself (called Unit ID in Sentinel)
The sixth field (column F) is Alert Tone (acceptable values are "Off" or numbers "1-9")
The seventh field (column G) is the Alert Tone Volume (acceptable values are "Auto" or numbers "1-15")
The eighth field (column H) is the Alert Light Color (acceptable values are "Off", "Blue", "Red", "Magenta", "Green", "Cyan", "Yellow", or "White")
The ninth field (column I) is the Alert Light Pattern (acceptable values are "On", "Slow Blink", or "Fast Blink")
You may now use Excel to modify these fields. Since the radio shop for my city assigns RIDs in blocks, I added all the RIDs for the block. I also wanted to still be able to uniquely ID each tag so I can go back and add more info to the tag later. Therefore, I added the last 5 digits of the RID to the name using the Excel RIGHT formula.
Here's an example:


I also had a few duplicates. I cleaned them up by highlighting the RID column, selecting "Conditional Formatting">"Highlight cell rules">"Duplicate Values", then manually scrolling through the list to eliminate duplicates.
4. When done in Excel, use "Save as..">"Other Formats">"Text (tab delimited)"
Save the RIDs using a file name you will remember
(These exact steps apply to Excel 2007 in Windows, but similar options can be found on other Excel versions)
5. Open the .txt file you just created in Excel using Notepad, copy and paste the UnitIds lines to replace the UnitIds lines in the f_0000xx.hpd file identified in Step 1, and save the .hpd file
If you were successful, you should see all your RIDs when you reopen Sentinel
")