Ok here is additional field programming instructions,but it's not easy!
To program without software and cable, here ya go;
Field Programming
Though the job can be done easily and more completely using a programming cable and a PC, It is likely that your radio is field programmable. It is an
amazingly cumbersome process, using the small LCD display and the top panel buttons and knobs. Still, it can be done with time and patience. This will only work if the radio has been internally modified by cutting a jumper, and if the feature has been enabled in software. Please note that depressing the lamp and DA buttons will bring up the SEL display, even if the radio has not been enabled, but you will not be able to make any selections.
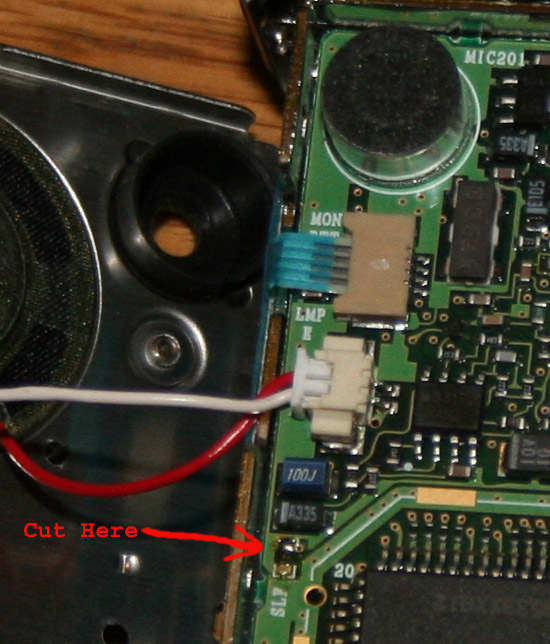
For those who love to tinker, have extra radios laying around, are made of money, or just like to live dangerously, I have included a photo to show you where to cut. As most of these radios have been through several owners by now, and have been in fleet or commercial service, there is a pretty good chance that this modifications has already been done. I should also mention that cutting the jumper alone will not make the radio field programmable. You will also need to connect to to a computer, run the KPG-23D program, and enable this feature in software.
I also feel the need to state that I am not recommending you make this modification, not holding myself as an expert on this radio, and disclaim all responsibility for you wrecking your radio. I am sorry to have to make such a statement; but as long as so many of us have absolved ourselves of responsibility for our own actions, or for anything else, and have decided to permit lawyers to rule the world, such things need to be said.
Instructions for disassembly are below. In addition to the basic disassembly, you will need to remove two tiny screws at the bottom of the front plate and then snap it loose. Once inside here, you will have access to the PC board. be very careful during disassembly, as there are many small cables and connectors.
Once field programming has been enabled, either by you or by a previous builder, The instructions below are simple enough, and will permit you to program the radio according to your requirements. Again, though you will not require a cable or PC to program, you will need one to enable the feature after the internal mod has been made.
- Press and hold both the "Lamp" and the "D/A" buttons while turning the radio on until "SEL" is displayed.
- Press "D/A" again and "CH 1" is displayed.
- Press the "PTT" button. The current receive frequency will be displayed. If channel has not been programmed, display will read "---------".
- Turning the channel knob with adjust frequency in12.5 KHz steps.
- Pressing lamp button while scrolling frequencies will change scroll step to 1 MHz.
- Pressing PTT button will save frequency, and advance to receive tone setting.
- Pressing the LO button will permit setting the tone with the channel knob. Pressing the LO key again will permit setting by DCS value. Pressing PTT will save.
- Transmit frequency and tone are now set by following the same steps as used to set receive frequency and tone.
- Display will now read either Add or DEL. This is for including the channel in scan, and can be changed with the channel selector, and saved with PTT.
- Display will now read On or Off for busy channel lock out. This can be changed with the channel selector, and I usually leave it off.
- The display will now read H or L for high and low transmit power. This can be changed with the channel selector and saved with PTT.
- Display will now read on or off for beat shift. This changes the settings for the internal oscillators, in case there is interference. I leave it off. PTT saves.
- Repeat above steps for each channel until radio is programmed. Turning off saves.
Programming features
- Press and hold both the "Lamp" and the "D/A" buttons while turning the radio on until "SEL" is displayed.
- Press TA button. This will display radio type and frequency. Note that this number needs to match the type number on the back of your radio. This is adjusted using the channel selector, but should never need to be changed. PTT saves.
"UHF1" covers "450-470MHz"
"UHF2" covers "470-490MHz"
"UHF3" covers "490-512MHz"
"UHF4" covers "406-430MHz"
- Battery saver can now be set for S, M, L or off. I usually leave mine off. PTT saves and advances to next selection.
- Time out timer can now be set to any value between 30 and 300 seconds. This is to prevent long transmissions. I leave this off. PTT saves.
- This selection enables or disables the scan button. Selections are scan or off. PTT saves and advances.
- This selection enables or disables the D/A button for adding and deleting channels from scan. Selections are da1 da2 off. PTT saves and advances.
- This selection enables or disables the TA button for the talkaround feature. Talkaround reverses transmit and receiver frequencies on duplex channels. This allows direct contact with other units on repeater channels, without having to go through a repeater. Selections are ta and off off. PTT saves and advances.
- This enables or disables the LO button for setting high and low power. Selections are lo and off. PTT saves and advances to next.
- This enables the monitor button, located above the PTT button. Monitor allows you to break the squelch and listen to the channel - or to signal another unit with tone. Selections are sql, off, sig1, sig2. I usually leave this on sql. PTT saves and advances.
- This enables beep tones. Selections are on and off. When on, the unit will beep every time you make a selection or hit a button. PTT saves and advances to end.
- Turning unit off saves all settings.
")
Radio shown here is a tk350 which is conventional, but programming is the same.
73,
n9zas