Trouble removing front faceplate from PSR-800

Status
Not open for further replies.

racin06

Member
Joined
May 30, 2004
Messages
673
Location
Westfield, Indiana
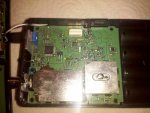
GRE sent me a new front faceplate to replace my old one in which the paint was rubbing off. However, I'm having trouble removing the old faceplate The primary board moves freely where the bottom and middle screws were removed, but board doesn't seem to budge at the top...where the top screws were removed. I don't see any other screws that must be removed either. How do I remove the primary board?

Also, I see the speaker wire has a connector on the end. Do I have to remove the board against the scanner in order to remove the old speaker wire and install the new?
 

Attachments

  • cover.jpg
    cover.jpg
    49.8 KB · Views: 965
Last edited:

Bob_61

Member
Joined
Oct 23, 2009
Messages
298
Location
Enfield,Ct.
GRE sent me a new front faceplate to replace my old one in which the paint was rubbing off. However, I'm having trouble removing the old faceplate The primary board moves freely where the bottom and middle screws were removed, but board doesn't seem to budge at the top...where the top screws were removed. I don't see any other screws that must be removed either. How do I remove the primary board?

It will come free with a little help, be careful and work it up little at a time. You can and will need to disconnect the speaker wire at the lite brown connector on the other board just follow the wire. And that brown ribbon "wire" will come out and go back in. You will also have to take the "key board" off the old face plate and put back into the new face plate that is where that flat brown ribbon wire comes into play. Put it back together slowly make sure the wires are all good and you should be good to go!
 

racin06

Member
Joined
May 30, 2004
Messages
673
Location
Westfield, Indiana
It looks as if the bottom board has to be removed in order to remove the speaker wire...that light brown connector isn't visible...is it behind the board? If so, does this board just pry up? It looks like the bottom of the squelch knob (the blue plate) has to be removed as well?
 

Attachments

  • cover2.jpg
    cover2.jpg
    67.9 KB · Views: 872
Last edited:

Bob_61

Member
Joined
Oct 23, 2009
Messages
298
Location
Enfield,Ct.
It looks as if the bottom board has to be removed in order to remove the speaker wire...that light brown connector isn't visible...is it behind the board? If so, does this board just pry up? It looks like the bottom of the squelch knob (the blue plate) has to be removed as well?

It is hard to see but those separate! The ant and squelch section on the top are so to speak one piece with that board and the face plate separate from them.
 

racin06

Member
Joined
May 30, 2004
Messages
673
Location
Westfield, Indiana
Installed the faceplate. Not really that big of a deal; however, the small brown ribbon wire did come loose and I had to reinstall. Anyway, I will say that I'm irritated at GRE because the new faceplate (without the paint) they sent me is full of sratches and I mean many scratches.
 
Last edited:

Bob_61

Member
Joined
Oct 23, 2009
Messages
298
Location
Enfield,Ct.
Installed the faceplate. Not really that big of a deal; however, the small brown ribbon wire did come loose and I had to reinstall. Anyway, I will say that I'm irritated at GRE because the new faceplate (without the paint) they sent me is full of sratches and I mean many scratches. Piss poor customer service.

It has a removable film that protects the face plate, you know like on the screens on cell phone and other electronics. It comes off easy, But I left my on until I get a case for it. Try lifting it up at one of the corners just a little bit if you just want to find out if is like mine. :)
 

buggiecar

W1COD
Premium Subscriber
Joined
Feb 28, 2006
Messages
89
Location
W.Hartford,CT
Got The Face plate Yesterday

I have owned my PSR-800 for a little over a year and contacted them about the faceplate...and yesterday it showed up in the mail...I took the short cut and unsoldered the speaker wires at the speaker...then soldered them on the new one...this whole swap took about 15 minutes and it looks like new!!
 
Status
Not open for further replies.
Top