Step 4: Control Heads
Finally finishing up this install, we come to the control heads. I apologize for not knowing how to use this forum software properly to position the pictures inline with the text. Before I show you the new install, let me show you how things used to be back in the good old days of my 2014 XLT. I only had 3 radios in that one, as opposed to 5 in this one. And in both cases only 2 of these radios are for voice and both of those have control heads and mics.
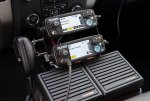
The first picture (hopefully) shows the standard control heads and speakers on a custom bracket that I was quite proud of. The center console in that truck did not occupy the entirety of the space between the seat and the dash, so it was quite different from the new truck. What we did back in 2014 was remove the front cup-holder and design/fabricate a custom 3D-printed (with a real 3D printer that costs $250K) plate that precisely fit the area previously occupied by the cup-holder assembly. This plastic plate held the two speakers and a metal bracket that held the control heads and mics. We built a custom metal bracket to hold two control heads instead of one, and it held a mic on each side (one mic is missing in this picture). This setup wasn't something most folks could do because of the special equipment necessary to fab the plastic and metal, but it was super nice and I was very happy with it. Once again, this was the OLD setup.
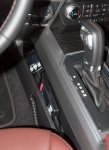
For the record, I like standard control heads best because they are easier to see and easier to use thanks to having knobs. But for the new truck, this was simply out of the question as there was no room whatsoever for standard control heads. So I had to resort to hand-held control heads instead. I had a hard time getting a decent photo of them, so I apologize for that. They are tucked into the cubbyhole on the driver's side of the center console, as you might be able to see in this down-on shot from the driver's seat.
There's not much to say about the actual install of these. The hard part was running the control cable from the RF decks to underneath the driver's seat, and also attaching the connectors on both ends. Installing the control heads was pretty much trivial and took all of two minutes.
Although I prefer standard control heads, these certainly do the job, and the overall install is very discrete, almost covert, if you will. As I said, this was probably the hardest install I've ever done, but it was my own fault. Next time I'll pay a little more attention to what sort of room I have behind the back seat before I buy a truck.