The project is done.

Refurbished battery for $23.04. First a word about SAFETY--NEVER short a Lithium battery...it could start a runaway chemical reaction and catch fire or explode. Work in a location where you can quickly get the battery to a safe outside location...hands/tools do slip--I know. Have something non-conductive and non-flammable ready to grab it if things go bad...it'll be extremely hot and you can't touch it.

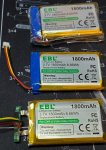
Amazon sent these three small batteries in a 12x8x6 box...seriously? They come in a small white box, then in a plastic bag. They have a three conductor JST connector. The blue kapton tape is easy to unwrap exposing the BMS.

Cut off the JST connectors and save them for a future project.

Then cut off the BMS...save them as well (I almost needed them for this project...more on that later). Test the batteries...they MUST be the same voltage (or very near as you see). Mark positive and negative so you don't insert them backwards and start a fire.


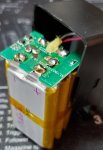
This is the hard part...I give it a medium to slightly difficult rating. It would be easier if the wiring to the case was longer and my hands didn't shake doing fine soldering. You need a small tip soldering iron. Removing the two outside batteries was easy since they are spot welded...it's the center that's a pain. You CAN NOT overhead the BMS or it will FRY the chips...I've done it a time or two. Quick work with the soldering iron an desolder stuff. The new battery's terminals are on the wide side--get the center position cleaned especially the outside edges. Test fit your batteries, then tape them together and insert in the BMS--DOUBLE CHECK POLARITY OF ALL BATTERIES. Bend the ends. Apply flux and solder in place. A quick word about solder. For years I just used whatever...then I found the Sn63/Pb37 with RA Flux. By far the best solder on the planet...I threw out all my other solder. This stuff melts at a low temp, flows very well, and hardens quickly...leaves a nice shiny finish letting you know it's a good weld. Perfect for soldering batteries.


Kapton tape and more kapton tape. I covered the BMS with 5 layers. You don't want a sharp solder joint poking thru and shorting something...good idea to check for sharp spots on your connections before taping.
Now for the rest of the story. After I put it together, my meter read zero volts. A few choice words were spoken. I took it out of the case and checked and rechecked. I thought I overheated the BMS removing solder and it was fried. Took a break and made dinner. I was about to quit...then an idea struck me. The three new batteries came with a BMS of their own. I was going to remove the Uniden BMS and replace it with ONE of the new, tiny, BMS--parallel batteries use only one BMS regardless of how many you have (my home built Li-Ion power wall is a 14s40p--meaning 40 parallel batteries share 1 of the 14 BMS leads). I cut the wires at the BMS (one at a time so I didn't short anything--same as for every cut doing this project). The Uniden BMS is hot (alive with volts), so I used a non-conductive screwdriver to scrape the glue off the BMS and inside the case. I rechecked the voltage and it was alive...3.9v as it should be. I was about to quit for no reason--the BMS more than likely shut down after it detected a sudden increase in voltage when I inserted the new batteries and needed a bit of time to reset itself. I installed new wiring from the case to the BMS--much longer wires so this will be easier next time. I covered the case wiring with kapton tape then coax seal for insulation (gotta watch for those sharp spots on your solder joints) and used another piece at the opposite end to hold the battery pack in place (probably not a good idea since it'll turn to goo when it gets hot...it was within arm's reach). Gave everything multiple layers of kapton tape and put it back together.


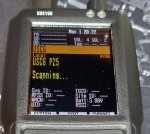
Works great. Charges fine. Would I do it again...absolutely. It was fun...and I can't see paying $50 for another Uniden battery that's going to go bad. If someone else made these batteries I'd get one of those, but not a Uniden...so the only other option is to rebuild it yourself. It's been charging for a few hours and up to 4.25v. The top of the battery (connector and BMS end) does feel warm...but not any warmer than the screen is.


