Ever wanted to monitor any local frequency OF YOUR CHOICE in a low-profile manner? Without the hassle of a scanner, radio, or antenna? Have a smartphone? Can't find a Broadcastify feed? Look no further.
For those that don't know, Zello is a PTT/radio style multi-platform software that runs off of internet. It can run on your PC or smartphone, even some other devices. It's meant to be a replacement to traditional two-way radios where they can't work correctly or effectively for whatever reason, such as loss of signal, long distance... Whatever. Read more on Zello. Live conversation..
The idea of Zello radio streams/feeds have been tossed around, but I haven't seen anyone do a full-out tutorial. It seems that everyone has their "flavor" of doing it. I've pieced together lots of information from those who have had success doing this, and my own knowledge and curiosity to piece together a tutorial on how to do this, for those interested. The difference between a Zello radio feed and a Broadcastify (we'll call it BC for short) or traditional audio stream is that rather than one big stream, still streaming when nothing is coming through on the radio/scanner, a Zello stream lets you join the "channel", and whenever something is received through the scanner/radio, it trips Zello into keying up so that you only actually "Receive" anything from your device when the scanner or radio does. Aside from that, the UI is a lot different. I guess it's preference based. From what I can tell the people that use this method of streaming do it because some frequencies are against the rules to stream on BC, some discovered this method by accident and like it, and some use this method in addition to BC or another traditional stream. Some also like to use it for personal/private use, such as myself, for whatever reason. If you can stream to Zello, you can definitely stream to BC as well using the same equipment. I urge you to check Broadcastify and see if whatever frequency you wish to stream is on there, and if it isn't, you might want to look into streaming for them as well.
I'll warn you now - Prepare for a huge post with lots of pictures.
So, back on topic... I thought this tutorial might benefit for anyone who wasn't quite sure how to set up something like this, or anyone who was interested in the whole process.
I used a Dell Vostro 200 desktop computer, and an old BC560XLT scanner and antenna I found that really wasn't being used other than monitoring a single frequency every once in a while.
Note: Zello or Zello@Work can both be used for streaming. For those that don't know, Zello is the completely free/"consumer" version, while Zello@Work is geared towards businesses and municipalities but still free for up to 5 users with no radio gateways (which aren't necessary unless you want to buy the interfaces and transmit with a radio). The process is mostly the same, I'll point out where it differs between versions.
Let's get started. Here's what you'll need.
-1x desktop computer that can run 24x7 or during the time frame you wish to have access to the stream. The computer must be capable of running the Zello client and have at least one sound card/mic jack/audio input. I even took it a step further by getting remote access via Splashtop.
-1x Scanner or radio with a 3.5mm headphone/External speaker audio output. (Note: while some portable radios have this or can accomplish this, such as those with the new Motorola lapel mics that have a headphone plug)
-1x Audio cable with 3.5mm jacks, length depends on where you want to place your scanner in relation to the mic jack.
-Zello software or Zello@Work client optimized for your network
-Zello or Zello@Work account/network
-A way/program of knowing the amplitude (volume) of what your sound input is taking in, in dB. I use Audacity, but I'm sure there's an easier way via the web or something. This is to make it easier to find a good VOX threshold.
-Some time to do this. It didn't take me long to do this at all, so I just used some of my free time. It might need some fine tuning after a little use, if you don't like how it sounds, but that shouldn't take any time at all. It really all depends on how much you want to fine-tune.
-A frequency to test dB levels/input levels on, such as FRS frequencies, definitely comes in handy. You can even use a bubble pack radio for this.
STEP 1:
Zello: Visit Zello. Live conversation. to download the software, and once downloaded, make an account. This account will be the one that feeds your channel.
Zello@Work: Visit Zello@Work Push-to-talk and create your @Work network. Once you're in your dashboard, make your users (at least two; one for the stream computer, one for you and whoever else wishes to listen). Download the client, which is specifically optimized for YOUR network only, and sign in with the stream computer username and password. (You could always use the default "admin" if you wanted)
STEP 2:
Zello: Once logged in, go to the top "menu" bar, and go to Tools>Create a channel. Type in the name of your channel, which should represent what you're streaming, such as "<town> Fire Dispatch" and whatever other information you're prompted for. A good idea might be to make a "Talk" channel in addition to your broadcast channel, for users to chat and exchange info and not interrupt the radio feed. If you wish to host a private feed, such as for "members only" of your organization, enable a password. You might also want to make it so that "Only I can talk" so other users can't speak up and interrupt the broadcasting (see the whole "talk" channel idea).
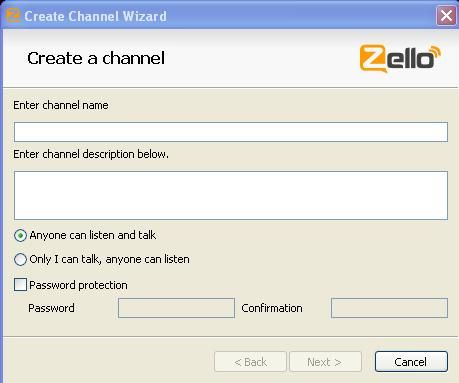
Zello@Work: In your dashboard, create a channel for your feed. This is one of the benefits of @Work, you can use whatever name you want, and you can make them simpler, such as "FIRE CH 1" or "POLICE". As long as you and the others in the network know what they are, you can name the channels anything you'd like.
STEP 3:
Once you've created your channel(s), it's time to connect your scanner to the computer. Place your scanner in any location you'd like, as long as you have enough cord to connect it to the computer. In my case, my audio cable was very small, so I had to sit the scanner right on top of the computer tower and plug it into the front mic jack. However, it doesn't bug me at all.
Go ahead and plug in the scanner's power, antenna, and audio cable. Plug the other end of the audio cable into your microphone jack/sound card of choice.
STEP 4:
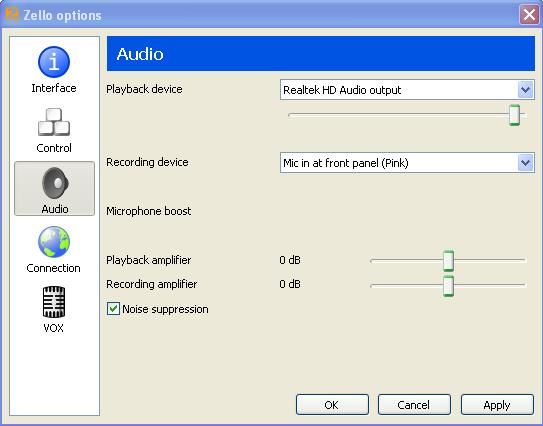
Check your Zello settings, make sure that your sound input is the one that your scanner is plugged into. Go to Tools>Options>Audio and go to the "Recording Device" drop down to select one. In my case, it is the front mic input, so that is what I chose.
STEP 5:
Now that we have verified that your scanner audio is indeed being sent to Zello, it's time to take some measurements. This is where the test frequency comes in handy. I like to take a recording in Audacity, and review it using the "Waveform (dB)" display option to view my dB levels, but I'm sure you can find any sort of meter online somewhere. Basically, what you're going to need to do, is either key up and say a word or two (I use an FRS frequency), or even use a button that beeps on the scanner. After switching to the dB reading setting using the "Audio Track" drop-down menu, I zoomed in, scrolled up, and found the point where I keyed up.

Go to Tools>Options>Controls to ensure VOX is on by checking the "Enable VOX for handsfree" box.
After that, you can go into Tools>Options>VOX
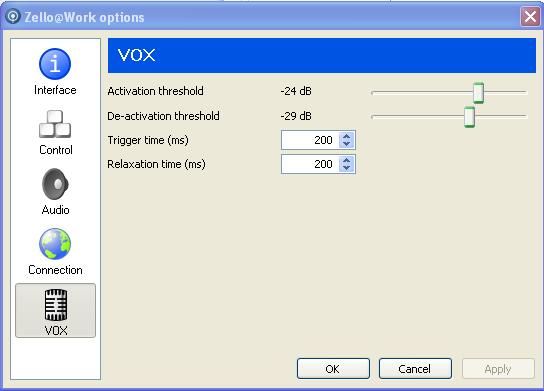
We can see that the scanner "hum" (the whole reason these steps are necessary) hangs out around -32ish dB at the current volume setting. However, when I keyed up, the dB reading rised. What we're looking for is an activation threshold. This needs to be a dB level where the "hum" isn't picked up, but the keying-up is, to a point where we won't miss any audio that doesn't make the cut. So the idea is to keep it as low as possible, but not into the "hum" zone. The de-activation threshold, however, is the audio level where Zello will de-key. This can be just into the "hum" zone. Again, you'll need to tweak it by moving up/down.
Please keep in mind, this is a BALLPARK reading, at least in Audacity. You'll still need to use the key-up or beep methods to really find the ideal threshold. Even going to the WX channels works for that.
In my case, I completed these steps earlier, and my activation threshold was -24dB and my de-activation threshold was -29dB at that scanner volume level. Keep in mind, if you move your scanner/radio volume knob, you'll need to find new thresholds, for obvious reasons!
This step can take a while, depending on how much you want to fine-tune, and how much patience you have!
STEP 6
Install Zello on your mobile device or other computer. For another computer, just install Zello or Zello@Work as you did on the stream computer.
Zello@Work instructions for mobile devices:
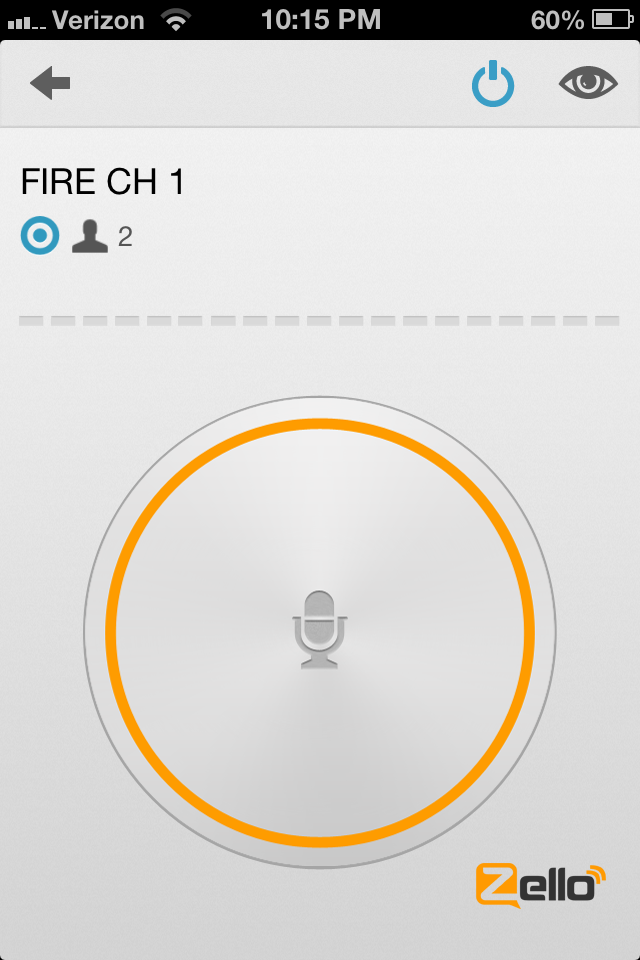
If you are running an iOS device, search "Zello" in the App Store and download the free app. When you open the app and are prompted to either create a new account, or sign into an existing one, select the gray "Zello@Work" button under the two options. Your username is the username you created in your dashboard for you to listen (NOT your stream username) and your password is obviously the password for that username. The "Network" is where you need to type your network name. This is what goes before the ".loudtalks.net" when you sign into your online dashboard. Log in, and select the feed channel. You will now receive audio both when the app is open, and when it is in your multitasking dock. You will receive audio transmission-by-transmission, with a notification for each. Turn notifications on/off in Settings>Notifications>Zello.
Pics of iOS Zello@Work:
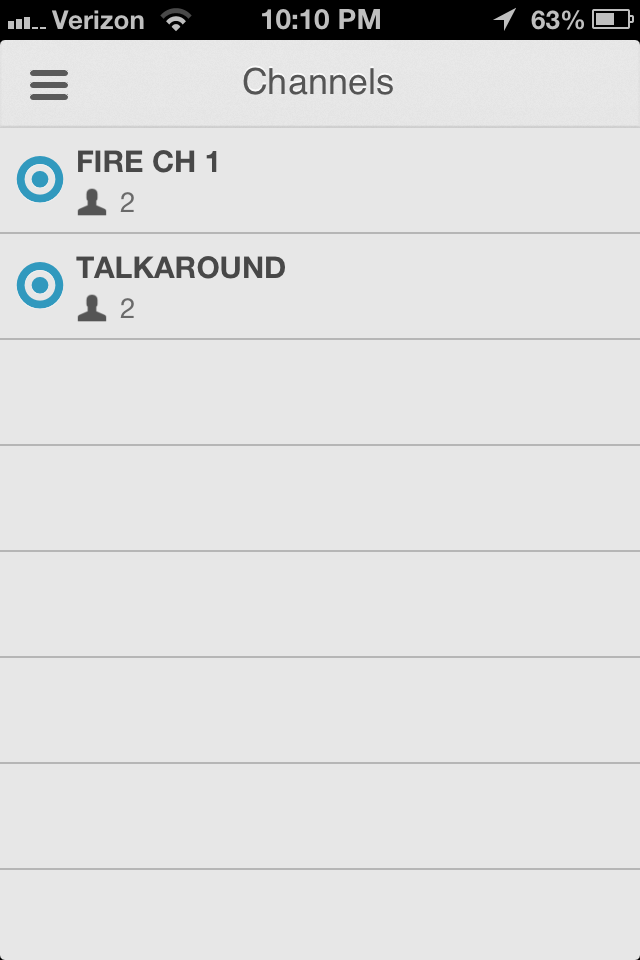
If you are running an Android device, follow these instructions. Install Zello@Work on Android : Zello Support
If your channel doesn't show up, ensure that you are added into it via the dashboard if it's a "Group" Channel or make it a "Dynamic" channel where you can leave/join from your external device.
Zello Instructions for mobile devices:
If you are running an iOS device, search "Zello" in the App Store and download the free app. When you open the app and are prompted to either create a new account, or sign into an existing one, make a new account (if you don't have one to LISTEN with), or sign into an existing one (to LISTEN with, can not be the stream computer username!!!) Search for your channel and join it.
If you are running an Android/b] device, search "Zello" in the Play Store and download the free app. When you open the app and are prompted to either create a new account, or sign into an existing one, make a new account (if you don't have one to LISTEN with), or sign into an existing one (to LISTEN with, can not be the stream computer username!!!) Search for your channel and join it.
Enjoy!
If you want to get fancy... You could even install Splashtop to remotely control the stream computer, or throw TwoToneDetect on there (like I did). You can stream to RR as well, like I mentioned.
Here's some questions that I suspect might be asked...
Why Zello???
It's all preference. I like it because it provides a full history of transmissions, it allows you to talk to others and listen to the feed at the same time, and it might even cut on data use, as it only streams when the scanner trips the VOX on the computer.
what is vox how do i vox
"VOX" stands for "Voice Operated Switch", which is basically a voice-activated (or scanner audio activated, in this case) PTT switch.
Who can use this?
I use it because I don't like carrying a scanner. I think anyone could listen to it, basically those to listen to other online feeds. However, if you go private, it could be used by a group of friends, a small/volunteer fire department, a small police department, a business owner, business employees, really anyone.
How reliable is it?
As with all technology it can quit at any time... I wouldn't rely on it as a primary method of notification (i.e. volunteer fire dept.). If the computer decides to crash, if Zello decides to crash, you wouldn't have any way of knowing. It's best to check the stream computer regularly.
Should I leave it on regularly?
Turn it on when you want. I use TwoToneDetect to notify me, and then I'll turn it on if I want to listen to a call. Turn it on whenever you would use a scanner, I guess.
The audio quality is terrible!
Turn down the scanner volume, and adjust the thresholds as needed. The audio might be a little quieter, but you won't get the distortion. I turned on noise suppression (in the audio tab in the options) and it seemed to help with background noise a tiny bit.
Can I set up one of these feeds if I have a BC or other feed set up as well?
Absolutely. And vise versa.
What scanners work with this setup?
Any scanners with a 3.5mm audio output, such as an external speaker jack or a headphone jack.
--
I also want to throw out another idea... Zello has an option to allow two instances to run at the same time (at least in @Work, haven't checked the normal version but I'd assume it's the same). This means, if you have multiple sound cards/audio input jacks (As that computer has) you might be able to hook up two scanners/radios, run two instances of Zello, and stream scanner audio using the different audio inputs. I have yet to try this, but it's on my to-do list.
--
Well, I hope this came in handy to some.
I wish you luck! Post any questions here.
For those that don't know, Zello is a PTT/radio style multi-platform software that runs off of internet. It can run on your PC or smartphone, even some other devices. It's meant to be a replacement to traditional two-way radios where they can't work correctly or effectively for whatever reason, such as loss of signal, long distance... Whatever. Read more on Zello. Live conversation..
The idea of Zello radio streams/feeds have been tossed around, but I haven't seen anyone do a full-out tutorial. It seems that everyone has their "flavor" of doing it. I've pieced together lots of information from those who have had success doing this, and my own knowledge and curiosity to piece together a tutorial on how to do this, for those interested. The difference between a Zello radio feed and a Broadcastify (we'll call it BC for short) or traditional audio stream is that rather than one big stream, still streaming when nothing is coming through on the radio/scanner, a Zello stream lets you join the "channel", and whenever something is received through the scanner/radio, it trips Zello into keying up so that you only actually "Receive" anything from your device when the scanner or radio does. Aside from that, the UI is a lot different. I guess it's preference based. From what I can tell the people that use this method of streaming do it because some frequencies are against the rules to stream on BC, some discovered this method by accident and like it, and some use this method in addition to BC or another traditional stream. Some also like to use it for personal/private use, such as myself, for whatever reason. If you can stream to Zello, you can definitely stream to BC as well using the same equipment. I urge you to check Broadcastify and see if whatever frequency you wish to stream is on there, and if it isn't, you might want to look into streaming for them as well.
I'll warn you now - Prepare for a huge post with lots of pictures.
So, back on topic... I thought this tutorial might benefit for anyone who wasn't quite sure how to set up something like this, or anyone who was interested in the whole process.
I used a Dell Vostro 200 desktop computer, and an old BC560XLT scanner and antenna I found that really wasn't being used other than monitoring a single frequency every once in a while.
Note: Zello or Zello@Work can both be used for streaming. For those that don't know, Zello is the completely free/"consumer" version, while Zello@Work is geared towards businesses and municipalities but still free for up to 5 users with no radio gateways (which aren't necessary unless you want to buy the interfaces and transmit with a radio). The process is mostly the same, I'll point out where it differs between versions.
Let's get started. Here's what you'll need.
-1x desktop computer that can run 24x7 or during the time frame you wish to have access to the stream. The computer must be capable of running the Zello client and have at least one sound card/mic jack/audio input. I even took it a step further by getting remote access via Splashtop.
-1x Scanner or radio with a 3.5mm headphone/External speaker audio output. (Note: while some portable radios have this or can accomplish this, such as those with the new Motorola lapel mics that have a headphone plug)
-1x Audio cable with 3.5mm jacks, length depends on where you want to place your scanner in relation to the mic jack.
-Zello software or Zello@Work client optimized for your network
-Zello or Zello@Work account/network
-A way/program of knowing the amplitude (volume) of what your sound input is taking in, in dB. I use Audacity, but I'm sure there's an easier way via the web or something. This is to make it easier to find a good VOX threshold.
-Some time to do this. It didn't take me long to do this at all, so I just used some of my free time. It might need some fine tuning after a little use, if you don't like how it sounds, but that shouldn't take any time at all. It really all depends on how much you want to fine-tune.
-A frequency to test dB levels/input levels on, such as FRS frequencies, definitely comes in handy. You can even use a bubble pack radio for this.
STEP 1:
Zello: Visit Zello. Live conversation. to download the software, and once downloaded, make an account. This account will be the one that feeds your channel.
Zello@Work: Visit Zello@Work Push-to-talk and create your @Work network. Once you're in your dashboard, make your users (at least two; one for the stream computer, one for you and whoever else wishes to listen). Download the client, which is specifically optimized for YOUR network only, and sign in with the stream computer username and password. (You could always use the default "admin" if you wanted)
STEP 2:
Zello: Once logged in, go to the top "menu" bar, and go to Tools>Create a channel. Type in the name of your channel, which should represent what you're streaming, such as "<town> Fire Dispatch" and whatever other information you're prompted for. A good idea might be to make a "Talk" channel in addition to your broadcast channel, for users to chat and exchange info and not interrupt the radio feed. If you wish to host a private feed, such as for "members only" of your organization, enable a password. You might also want to make it so that "Only I can talk" so other users can't speak up and interrupt the broadcasting (see the whole "talk" channel idea).

Zello@Work: In your dashboard, create a channel for your feed. This is one of the benefits of @Work, you can use whatever name you want, and you can make them simpler, such as "FIRE CH 1" or "POLICE". As long as you and the others in the network know what they are, you can name the channels anything you'd like.
STEP 3:
Once you've created your channel(s), it's time to connect your scanner to the computer. Place your scanner in any location you'd like, as long as you have enough cord to connect it to the computer. In my case, my audio cable was very small, so I had to sit the scanner right on top of the computer tower and plug it into the front mic jack. However, it doesn't bug me at all.
Go ahead and plug in the scanner's power, antenna, and audio cable. Plug the other end of the audio cable into your microphone jack/sound card of choice.
STEP 4:
Check your Zello settings, make sure that your sound input is the one that your scanner is plugged into. Go to Tools>Options>Audio and go to the "Recording Device" drop down to select one. In my case, it is the front mic input, so that is what I chose.

STEP 5:
Now that we have verified that your scanner audio is indeed being sent to Zello, it's time to take some measurements. This is where the test frequency comes in handy. I like to take a recording in Audacity, and review it using the "Waveform (dB)" display option to view my dB levels, but I'm sure you can find any sort of meter online somewhere. Basically, what you're going to need to do, is either key up and say a word or two (I use an FRS frequency), or even use a button that beeps on the scanner. After switching to the dB reading setting using the "Audio Track" drop-down menu, I zoomed in, scrolled up, and found the point where I keyed up.

Go to Tools>Options>Controls to ensure VOX is on by checking the "Enable VOX for handsfree" box.
After that, you can go into Tools>Options>VOX

We can see that the scanner "hum" (the whole reason these steps are necessary) hangs out around -32ish dB at the current volume setting. However, when I keyed up, the dB reading rised. What we're looking for is an activation threshold. This needs to be a dB level where the "hum" isn't picked up, but the keying-up is, to a point where we won't miss any audio that doesn't make the cut. So the idea is to keep it as low as possible, but not into the "hum" zone. The de-activation threshold, however, is the audio level where Zello will de-key. This can be just into the "hum" zone. Again, you'll need to tweak it by moving up/down.
Please keep in mind, this is a BALLPARK reading, at least in Audacity. You'll still need to use the key-up or beep methods to really find the ideal threshold. Even going to the WX channels works for that.
In my case, I completed these steps earlier, and my activation threshold was -24dB and my de-activation threshold was -29dB at that scanner volume level. Keep in mind, if you move your scanner/radio volume knob, you'll need to find new thresholds, for obvious reasons!
This step can take a while, depending on how much you want to fine-tune, and how much patience you have!
STEP 6
Install Zello on your mobile device or other computer. For another computer, just install Zello or Zello@Work as you did on the stream computer.
Zello@Work instructions for mobile devices:
If you are running an iOS device, search "Zello" in the App Store and download the free app. When you open the app and are prompted to either create a new account, or sign into an existing one, select the gray "Zello@Work" button under the two options. Your username is the username you created in your dashboard for you to listen (NOT your stream username) and your password is obviously the password for that username. The "Network" is where you need to type your network name. This is what goes before the ".loudtalks.net" when you sign into your online dashboard. Log in, and select the feed channel. You will now receive audio both when the app is open, and when it is in your multitasking dock. You will receive audio transmission-by-transmission, with a notification for each. Turn notifications on/off in Settings>Notifications>Zello.
Pics of iOS Zello@Work:


If you are running an Android device, follow these instructions. Install Zello@Work on Android : Zello Support
If your channel doesn't show up, ensure that you are added into it via the dashboard if it's a "Group" Channel or make it a "Dynamic" channel where you can leave/join from your external device.
Zello Instructions for mobile devices:
If you are running an iOS device, search "Zello" in the App Store and download the free app. When you open the app and are prompted to either create a new account, or sign into an existing one, make a new account (if you don't have one to LISTEN with), or sign into an existing one (to LISTEN with, can not be the stream computer username!!!) Search for your channel and join it.
If you are running an Android/b] device, search "Zello" in the Play Store and download the free app. When you open the app and are prompted to either create a new account, or sign into an existing one, make a new account (if you don't have one to LISTEN with), or sign into an existing one (to LISTEN with, can not be the stream computer username!!!) Search for your channel and join it.
Enjoy!
If you want to get fancy... You could even install Splashtop to remotely control the stream computer, or throw TwoToneDetect on there (like I did). You can stream to RR as well, like I mentioned.
Here's some questions that I suspect might be asked...
Why Zello???
It's all preference. I like it because it provides a full history of transmissions, it allows you to talk to others and listen to the feed at the same time, and it might even cut on data use, as it only streams when the scanner trips the VOX on the computer.
what is vox how do i vox
"VOX" stands for "Voice Operated Switch", which is basically a voice-activated (or scanner audio activated, in this case) PTT switch.
Who can use this?
I use it because I don't like carrying a scanner. I think anyone could listen to it, basically those to listen to other online feeds. However, if you go private, it could be used by a group of friends, a small/volunteer fire department, a small police department, a business owner, business employees, really anyone.
How reliable is it?
As with all technology it can quit at any time... I wouldn't rely on it as a primary method of notification (i.e. volunteer fire dept.). If the computer decides to crash, if Zello decides to crash, you wouldn't have any way of knowing. It's best to check the stream computer regularly.
Should I leave it on regularly?
Turn it on when you want. I use TwoToneDetect to notify me, and then I'll turn it on if I want to listen to a call. Turn it on whenever you would use a scanner, I guess.
The audio quality is terrible!
Turn down the scanner volume, and adjust the thresholds as needed. The audio might be a little quieter, but you won't get the distortion. I turned on noise suppression (in the audio tab in the options) and it seemed to help with background noise a tiny bit.
Can I set up one of these feeds if I have a BC or other feed set up as well?
Absolutely. And vise versa.
What scanners work with this setup?
Any scanners with a 3.5mm audio output, such as an external speaker jack or a headphone jack.
--
I also want to throw out another idea... Zello has an option to allow two instances to run at the same time (at least in @Work, haven't checked the normal version but I'd assume it's the same). This means, if you have multiple sound cards/audio input jacks (As that computer has) you might be able to hook up two scanners/radios, run two instances of Zello, and stream scanner audio using the different audio inputs. I have yet to try this, but it's on my to-do list.
--
Well, I hope this came in handy to some.
I wish you luck! Post any questions here.
Last edited:

