Making a GPS for the SDS-100, total cost is about $42.
I searched for and read lot's of threads. This is what worked for me. Hopefully it will save you some time or money.
Buy a GlobalSat BR-335-S4 $30-$35 on Amazon http://a.co/3aMYTZk
Buy a pack of mini usb male type b plugs $7 on Amazon http://a.co/bLeFpvi
Find an older USB cable in your junk drawer. It needs a female type A end on it (the end that plugs into a computer or charger), the other end doesn't matter because you are going to cut it off. Look for the largest gauge wire. If the wire is too small it may not carry enough current for the scanner.
Cut the end off of the GPS puck and USB cable. Don't forget to slide some heat shrink tube over the wires before you start soldering.
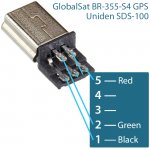
Solder the red wires together and to pin 5, Black wires together and to pin 1, Green wires together and to pin 2. I soldered wires to the three pins on the USB plug first and then soldered the 3 different sets of wires to the leads. Solder the bare wires together. The white wires are not used. Sketch it out before you start soldering - I should have done that to save time and rework.
This cable will power the GPS and the scanner. The attached picture shows the pinouts and wires.
When you plug your new GPS/cable into the scanner and a power source the scanner should show GPS at the bottom of the screen. To test the operation of the GPS, use the zip services button and enter the zip code for a distant city. Watch the scanner, it should change to your local area automatically.
I searched for and read lot's of threads. This is what worked for me. Hopefully it will save you some time or money.
Buy a GlobalSat BR-335-S4 $30-$35 on Amazon http://a.co/3aMYTZk
Buy a pack of mini usb male type b plugs $7 on Amazon http://a.co/bLeFpvi
Find an older USB cable in your junk drawer. It needs a female type A end on it (the end that plugs into a computer or charger), the other end doesn't matter because you are going to cut it off. Look for the largest gauge wire. If the wire is too small it may not carry enough current for the scanner.
Cut the end off of the GPS puck and USB cable. Don't forget to slide some heat shrink tube over the wires before you start soldering.
Solder the red wires together and to pin 5, Black wires together and to pin 1, Green wires together and to pin 2. I soldered wires to the three pins on the USB plug first and then soldered the 3 different sets of wires to the leads. Solder the bare wires together. The white wires are not used. Sketch it out before you start soldering - I should have done that to save time and rework.
This cable will power the GPS and the scanner. The attached picture shows the pinouts and wires.
When you plug your new GPS/cable into the scanner and a power source the scanner should show GPS at the bottom of the screen. To test the operation of the GPS, use the zip services button and enter the zip code for a distant city. Watch the scanner, it should change to your local area automatically.