G3 sync fix!

Status
Not open for further replies.

CLynch7

Member
Joined
Apr 13, 2009
Messages
183
Location
North GA
I posted this to the G3 group and sent it to the Herculodge blog as well.

My G3 had developed the sync detector issue, as it is from the first run SN#
472. It seemed to work well when I got it, but over time, I guess due to the
component values settling, the sync got worse and worse, and finally settled
into the usual 1 khz low. Since I purchased the unit on eBay, there was no
warranty, and it is the 3rd unit I've had, and I didn't feel like trying to work
something out with Eton. Everything else is great about it, sensitivity and
selectivity, and the MW is clear, strong and as birdy-free as I suppose it can
be. So, surgery time!

Plug in the correct 8v 200ma ac adapter, and take out the batteries. Unit
disassembly is strait forward. 6 screws on the back (the ones with the arrows)
are removed, and one in the battery compartment. DO NOT REMOVE THE ONE THE
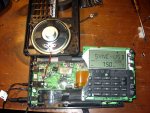
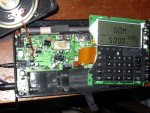
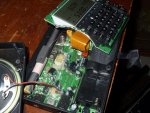
SCREW HOLDING THE WHIP ANTENNA!!! Once apart, remove the 7 (I think) screws
holding the button and display board. You'll have to maneuver the halves around
to get to all of the screws, there are wires from the VCO, speaker, and the
whip, and the ribbon cable from the button board is short. Refer to pictures
posted for what final disassembly looks like. I pulled the button matrix out and
fitted it where it would be when the radio is assembled. Tune to a strong
station (I live in the ATL metro, so I used WSB 750) and turn on the sync. Now,
locate c113, a small white variable cap to the left of the ribbon cable, and
turn it until the voices are clear! I would suggest using headphones for this.
Peak using the S-meter, and check both upper and lowers sidebands. Reassemble
the radio.

After the repair, ssb performance is still quite good. ECSS is still possible,
and effective. Nothing else seems to have changed performance-wise. The sync
will occasionally loose the lock and start wailing, but turning off the sync and
turning it back on will correct this. I guess time will tell, but I think this
is it! I'll be watching the group if anyone has questions or comments. I'd
like to hear how this works for others!
 

Attachments

  • SN851864.jpg
    SN851864.jpg
    97.1 KB · Views: 5,473
  • SN851868.jpg
    SN851868.jpg
    86.6 KB · Views: 5,240
  • SN851871.jpg
    SN851871.jpg
    96.1 KB · Views: 5,243

ka3jjz

Wiki Admin Emeritus
Joined
Jul 22, 2002
Messages
25,361
Location
Bowie, Md.
This is good work, Chris. Hopefully this has also gotten posted somewhere like mods.dk and the G3 Yahoo group. 73 Mike
 

kb2vxa

Completely Banned for the Greater Good
Banned
Joined
Mar 22, 2005
Messages
6,100
Location
Point Pleasant Beach, N.J.
"The sync will occasionally loose the lock and start wailing, but turning off the sync and turning it back on will correct this."

A good indication you're on track but not at the station. That "wailing" is the BFO heterodyning when it's supposed to be zero beat or close to it when unlocked. The reason it's losing lock is because the frequency is too far off for the lock to hold. This reminds me of people trying to tune in an older analog FM broadcast receiver with the AFC on dragging stations across the band and snapping from one strong station to another skipping everything in between. The cure for the problem is tuning with the AFC off, then switching it on locking in the station.

Done properly the BFO sync should be disabled and that cap rocked back and forth until the lowest note (preferably none) is found and then the sync re-enabled. Lacking the service manual, schematic and knowledge of how to use them your best bet is tune it using the WEAKEST usable signal, a strong one, especially a powerful local is causing the circuit to "pull" making the adjustment difficult and sloppy at best.
 

DPD1

Member
Joined
Jul 24, 2005
Messages
1,994
Other than the problem, how is it compared to the G5?
 

CLynch7

Member
Joined
Apr 13, 2009
Messages
183
Location
North GA
Warren- It is just an issue on the strongest stations, ones normally that would not need the sync. I figure ballparking it better than nothing. Does the radio work better than it did before I worked on it? Yeah, it is more useable now. Good enough for me.

Dave- Get the g5, it is still a better radio.
 

Atagrasin

Newbie
Joined
Jun 6, 2010
Messages
1
G3 sync fix

Dave- Get the g5, it is still a better radio

Hi Chris, why is the G5 a better radio than the G3?

Thanks

Atagrasin
 

CLynch7

Member
Joined
Apr 13, 2009
Messages
183
Location
North GA
Mostly due to sensitivity of the G3. It starts to go down above 9 mhz and really drops after 21. I miss the back lit buttons, the air band is not very good, and I like using the ferrite bar up to 3mhz.
 

Hamwannabe57

Newbie
Joined
Jul 27, 2012
Messages
2
Thanks for the g3 fix and another question

After finding my newly purchased g3 from RadioShack did not perform well in sync mode, I immediately cracked the case per your instructions, likely voiding the warranty. I quickly obtained good performance by rocking the indicated control back and forth while switching between AM sync for USB and LSB. Having completed that, and having now observed a slight non-ideality in the SSB behavior, I have another question that you may be able to answer for us.

What I notice is that, when tuned to a dead area of an HF band where there is nothing but background noise, and then switching back and forth between USB and LSB while in SSB mode, the audible noise is not consistent between USB and LSB. Ordinarily, that suggests the BFO is not dead center of a radio's pass band. In practical terms, it can mean that reception will be inconsistent between USB and LSB; i.e., one may exhibit audio frequency response that differs from the other.

I am wondering if the same little tuning trimmer that determines AM sync behavior will also determine where the BFO is in SSB mode. If so, then I need to crack the case on the g3 one more time and twiddle the little trimmer until I get perfectly uniform noise spectra for both SSB modes. Incidentally, this would also suggest a potentially very accurate way of getting AM sync tuned right. However, if it is not the same simple control for AM sync and for SSB, then I would like to know whether there's a separate trimmer that is known to set the BFO for SSB. Any thoughts, or must I do the experiment to find out?

Also incidental: I was unable to get decent behavior out of any HF mode while using the supplied power cube. There was an overwhelming amount of 60hz jitter in the BFO, among other things. The above adjustments were done with a fresh set of alkaline batteries. I'm told the unit was apparently shipped with the wrong power cube, a 6 volt cube whereas the correct one is supposed to be 8 volts. I'm thinking the higher supply may provide enough headroom for an internal regulator to take out the 60hz ripple, but I don't yet have the 8V cube and can't test to confirm. If Eaton/grundig could get their act together on these simple initial issues, I think they'd have a great product.
 

Hamwannabe57

Newbie
Joined
Jul 27, 2012
Messages
2
Just a little follow-up: Eaton did send me the correct 8 v power cube. They were very prompt. That cleared up the 60hz hum problem, many performance issues, and enabled charging of nimh batteries.

I tinkered with the SYNC detector trimmer some more, to see if it affected the observed USB/LSB asymmetry, but found it did not affect that problem. We need a little more info from a guru to tell us where to tweak the SSB passband filter/BFO alignment. It is slightly annoying, as is, but does not impair HAM band reception very much. It is just a shame eaton's factory setup was not a little more precise.
 

matthias_h

Member
Joined
Jul 10, 2013
Messages
24
Grundig/Eton G3 SSB, SYNC Quartz trimmers

I figured out this:

The trimmers are very sensitive. A 1-2 degree turn, really a "touch" more than a turn makes an audible difference. The perfect adjustment point is microscopically small with practically no mechanical tolerance to left or right. That is probably why the factory adjustment at the assembly line under time pressure is not spot on.

Open radio carefully, internal wires between the housing halves are short and can tear. Run radio on fresh batteries, leave all internal cables connected between the two housing halves. Tune radio to a station broadcasting on known exact frequency, e.g. 5000 kHz or 10000 kHz (WWV/WWVH NIST Time Signal). Other radio stations may be slightly off center themselves resulting in off center radio adjustment.

Use a plastic trimmer tool if available, a metal precision screwdriver acts as part of the oscillator circuit while in use and falsifies the adjustment result. It's possible to use it but it takes more tinkering time.

Check frequency display often during adjustment procedure, the tune wheel knob can turn accidentally while working on the radio and detune station reception.

- SYNC frequency adjustment: C113 (left of ribbon connector)

Sync trim procedure: turn C113 ever so slightly and compare audio results by toggling between SYNC-USB and SYNC-LSB on known stable station. Find "sweet adjustment spot" so that both syncs sound practically the same.

- SSB frequency adjustment: C140 (next to SW wide-nar selector)

SSB adjustment procedure: set +/- fine tune wheel to its mechanical center position. Adjust C140 ever so slightly to find the "sweet adjustment spot" so that both SSBs, USB and LSB, sound clear and no whaling can be heard on either.

- AM frequency adjustment: Q31 (above ribbon connector, next to shielded block). This seems to be good as set by the factory.
 

rogerx

Member
Joined
Oct 24, 2006
Messages
67
Location
Ohio
EXCELLENT FOLLOW-UP BY MATTHIAS_H on 03-31-2014, 9:49 PM.

My Grundig G3, likely one of the first ones purchased during it's initial release (in 2009?), seemed to suffer from this similar synchronous detection problem. Seems as soon as I pressed the sync button, signal would be significantly hampered or significantly degraded without any signal after using the fine tuner on both sync LSB or sync USB.

After playing with the C113 (and C140) on board tuning dials, I can now use the fine tune knob and while hearing an increasingly or decreasingly audible signal. However these internal tuning dials (ie. C113 and C140) are very cheap or provide seemingly vague tuning, likely due to their size. Hence you are likely not able to mess-up your unit anymore by simply readjusting these PCB dials unless you turn the dials more than one turn and subsequently forget their initial position, or the person tuning does not know how to tune a simple radio dial to hear an audible signal!

Some further notes: As previously mentioned, try not to remove the FM telescopic antenna screw. The FM antenna screw is very easily mistaken for a rear panel mounting screw, and is identified immediately below the telescopic swivel antenna insertion into the radio. The front button panel also has to be carefully removed, and the buttons on the panel are still (carefully) pushed/activated while removed from the front button panel. Make sure you record your frequencies in case all power is lost. (All of this has been previously mentioned.)

I think this whole problem seems to be focused around dust (or maybe corrosion) within these on board PCB tuning dials! I'm siding with simple dust, due to the fact they're still shiny copper on the exterior. And, also since after adjusting the tuning dials I found the best setting was the initial setting of the tuning dial of both C113 & C140! (C140 will be significantly effected by metal screwdrivers, but simply just remove the screw driver after each adjustment.)

One additional odd thing I did notice, one of my internal AM antennas leading to the internal magnetic coil antenna was rubbing against a large capacitor and appeared to be affected by heat by having it's external red coating apparently melted off. Although minor as most AM antenna leads do tend to be bare wire anyways, I did take the additional step of moving or relocating this delicate AM antenna lead wire over the cooler resistors and away from the capacitor.
 
Last edited:

nextgenfm

Member
Joined
Feb 7, 2015
Messages
9
Location
Maryland
Hi

I just registered to say THANK YOU to CLynch and Matthias and everyone who helped for this great fix.

I had bought a G3 years ago, and always wandered why it sounded a bit "off" haha, when I was using the sync detector and ssb.

This fixed my issues, and the sync detector now works like my sony icf -SW7600GR, almost just as well! No more "wailing and screaming"! HAHA
 

nextgenfm

Member
Joined
Feb 7, 2015
Messages
9
Location
Maryland
I figured out this:

The trimmers are very sensitive. A 1-2 degree turn, really a "touch" more than a turn makes an audible difference. The perfect adjustment point is microscopically small with practically no mechanical tolerance to left or right. That is probably why the factory adjustment at the assembly line under time pressure is not spot on.

Open radio carefully, internal wires between the housing halves are short and can tear. Run radio on fresh batteries, leave all internal cables connected between the two housing halves. Tune radio to a station broadcasting on known exact frequency, e.g. 5000 kHz or 10000 kHz (WWV/WWVH NIST Time Signal). Other radio stations may be slightly off center themselves resulting in off center radio adjustment.

Use a plastic trimmer tool if available, a metal precision screwdriver acts as part of the oscillator circuit while in use and falsifies the adjustment result. It's possible to use it but it takes more tinkering time.

Check frequency display often during adjustment procedure, the tune wheel knob can turn accidentally while working on the radio and detune station reception.

- SYNC frequency adjustment: C113 (left of ribbon connector)

Sync trim procedure: turn C113 ever so slightly and compare audio results by toggling between SYNC-USB and SYNC-LSB on known stable station. Find "sweet adjustment spot" so that both syncs sound practically the same.

- SSB frequency adjustment: C140 (next to SW wide-nar selector)

SSB adjustment procedure: set +/- fine tune wheel to its mechanical center position. Adjust C140 ever so slightly to find the "sweet adjustment spot" so that both SSBs, USB and LSB, sound clear and no whaling can be heard on either.

- AM frequency adjustment: Q31 (above ribbon connector, next to shielded block). This seems to be good as set by the factory.

I had to trimmer 113 quite a ways from its original setting!
 
Status
Not open for further replies.
Top