MA-radio-guy
Member
- Joined
- Mar 30, 2019
- Messages
- 12
All,
Due to the interest in the thread Jon recently started about a possible Raspberry Pi remote head project, I thought I would post an update on my own project.
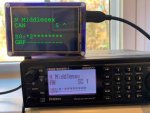
In the last several months, I have been working on a remote head project for my BCD996P2. It uses a Raspberry Pi3 as the compute as well as a 480x320 pixel, 3.5" touchscreen. The Pi and screen are mounted in a compact case and the connection to the scanner is via USB. The remote head is for display and control only -- it does not carry audio as that is not possible over USB. It is likely that the project will also work without modification with the BCD326P2 (and possibly other Uniden models that use the same protocol).
My goals were to build a remote head that is very compact but yet still easily readable. I chose to go with the 3.5" touchscreen as it can be mounted directly to the Pi and put into a compact case. It probably wouldn't be hard to support a larger external display though. In some ways a touchscreen isn't ideal for interaction as it doesn't have the tactile feedback that real buttons do but it is FAR easier to create a remote head this way.
The cost of all of the parts is around $100 which includes the Pi, the case, a power adapter for the Pi and the touchscreen.
I have plans to buy a SDS200 in the next several months and adapt the code to it... the challenge will be with the additional display information that is available on the SDS series and getting it to fit into 3.5". Several changes with the SDS version would be: use of Wifi/Ethernet for the remote head connection, possibly a bigger display and the possibility of carrying audio to the remote head.
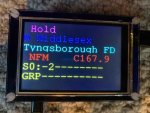
I consider my current project in "Alpha" state, but it works well enough to control the basics of the scanner. My initial focus has been on mirroring the display and the most frequent actions that a scanner user will perform -- mostly changing volume/squelch and what banks to scan. I have also had fun trying out lots of different color schemes! Here is a description of the current feature set:
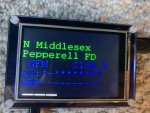
- Mirror the scanner's display. It is updated in almost real time.
- Large signal strength meter at the bottom of the screen (this is the one element that is rendered differently than the built-in LCD does)
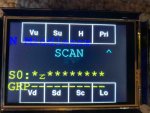
- Volume up/down controls (Vu and Vd "buttons" in the photos)
- Squelch up/down controls (Su and Sd "buttons" in the photos)
- Hold / Scan controls (H and Sc "buttons" in the photos)
- Priority key (Pri "button" in the photos)
- Lockout key (Lo "button" in the photos)
- Keypad for entering quick keys (for changing banks)
- Ability to change the display colors (I have many built-in color schemes
All interaction is done via touch screen. I am still playing around with the user interface but it works like this:
- If you touch the center of the screen then an "overlay" set of important buttons is displayed. These touchscreen buttons provide the main controls of the scanner (e.g. volume up / down). Touching the center again will hide the overlay keys.
- If you touch the upper right corner, it will advance one cycle in the built in color palettes
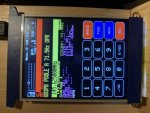
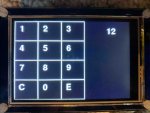
- If you touch the upper left corner, it will display a dedicated keypad page for entering a quick key. The numbers you enter are shown to the right of the pad. Pressing the "E" (enter) key will exit the keypad mode.
- If you are in hold mode, you can touch the left and right centers of the screen to advance forward and back
- If you are in scan mode, you can touch the left and right centers of the screen to change the scan direction
Photos are attached. Some notes
- You can see how compact the remote head (shown with 996 for relative comparison)
- The overlay buttons are shown in one photo -- descriptions of the button labels are above
- The signal strength meter can be seen in one of the photos (segmented white bars at the very bottom of the display)
- The variety of the color schemes is shown
- The quick key pad is shown. To the right of the keypad is the actual numbers entered ("12" in the photo)
I want to state again that this project is still Alpha and not ready to release in any form. I would like to eventually release the software in the public domain and put together a document on how to self assemble one.
Feedback is welcome, especially in regards to the next set of features to add
thanks
MA-radio-guy


