Multiple Antenna Question for 2M/70CM

Status
Not open for further replies.

ccg_ga

Member
Joined
Nov 24, 2018
Messages
112
Location
Cumming, GA
This video shows a rack that was pretty popular with the TJ & YJ, but their website seems to be gone. They made some racks that the radio could be inside a pop-down type thing, similar to the sunglasses cubby in many vehicles.

They might be around, used, on Jeep forums
You could also check with Davey's Jeeps, in Ohio.


The radios are actually mounted to something very similar. It is an overhead console rack from Smittybilt that has a MOLLE system wrapper around it that you can attach pretty much anything with MOLLE straps to. Tuffy used to make a locking overhead console with a DIN size radio opening back in the day when the TJ's were the new model. I don't think they make it anymore, but that is where I got the idea from for mounting the radios. I had a similar setup with an ICOM IC-2800H in my 2000 TJ.
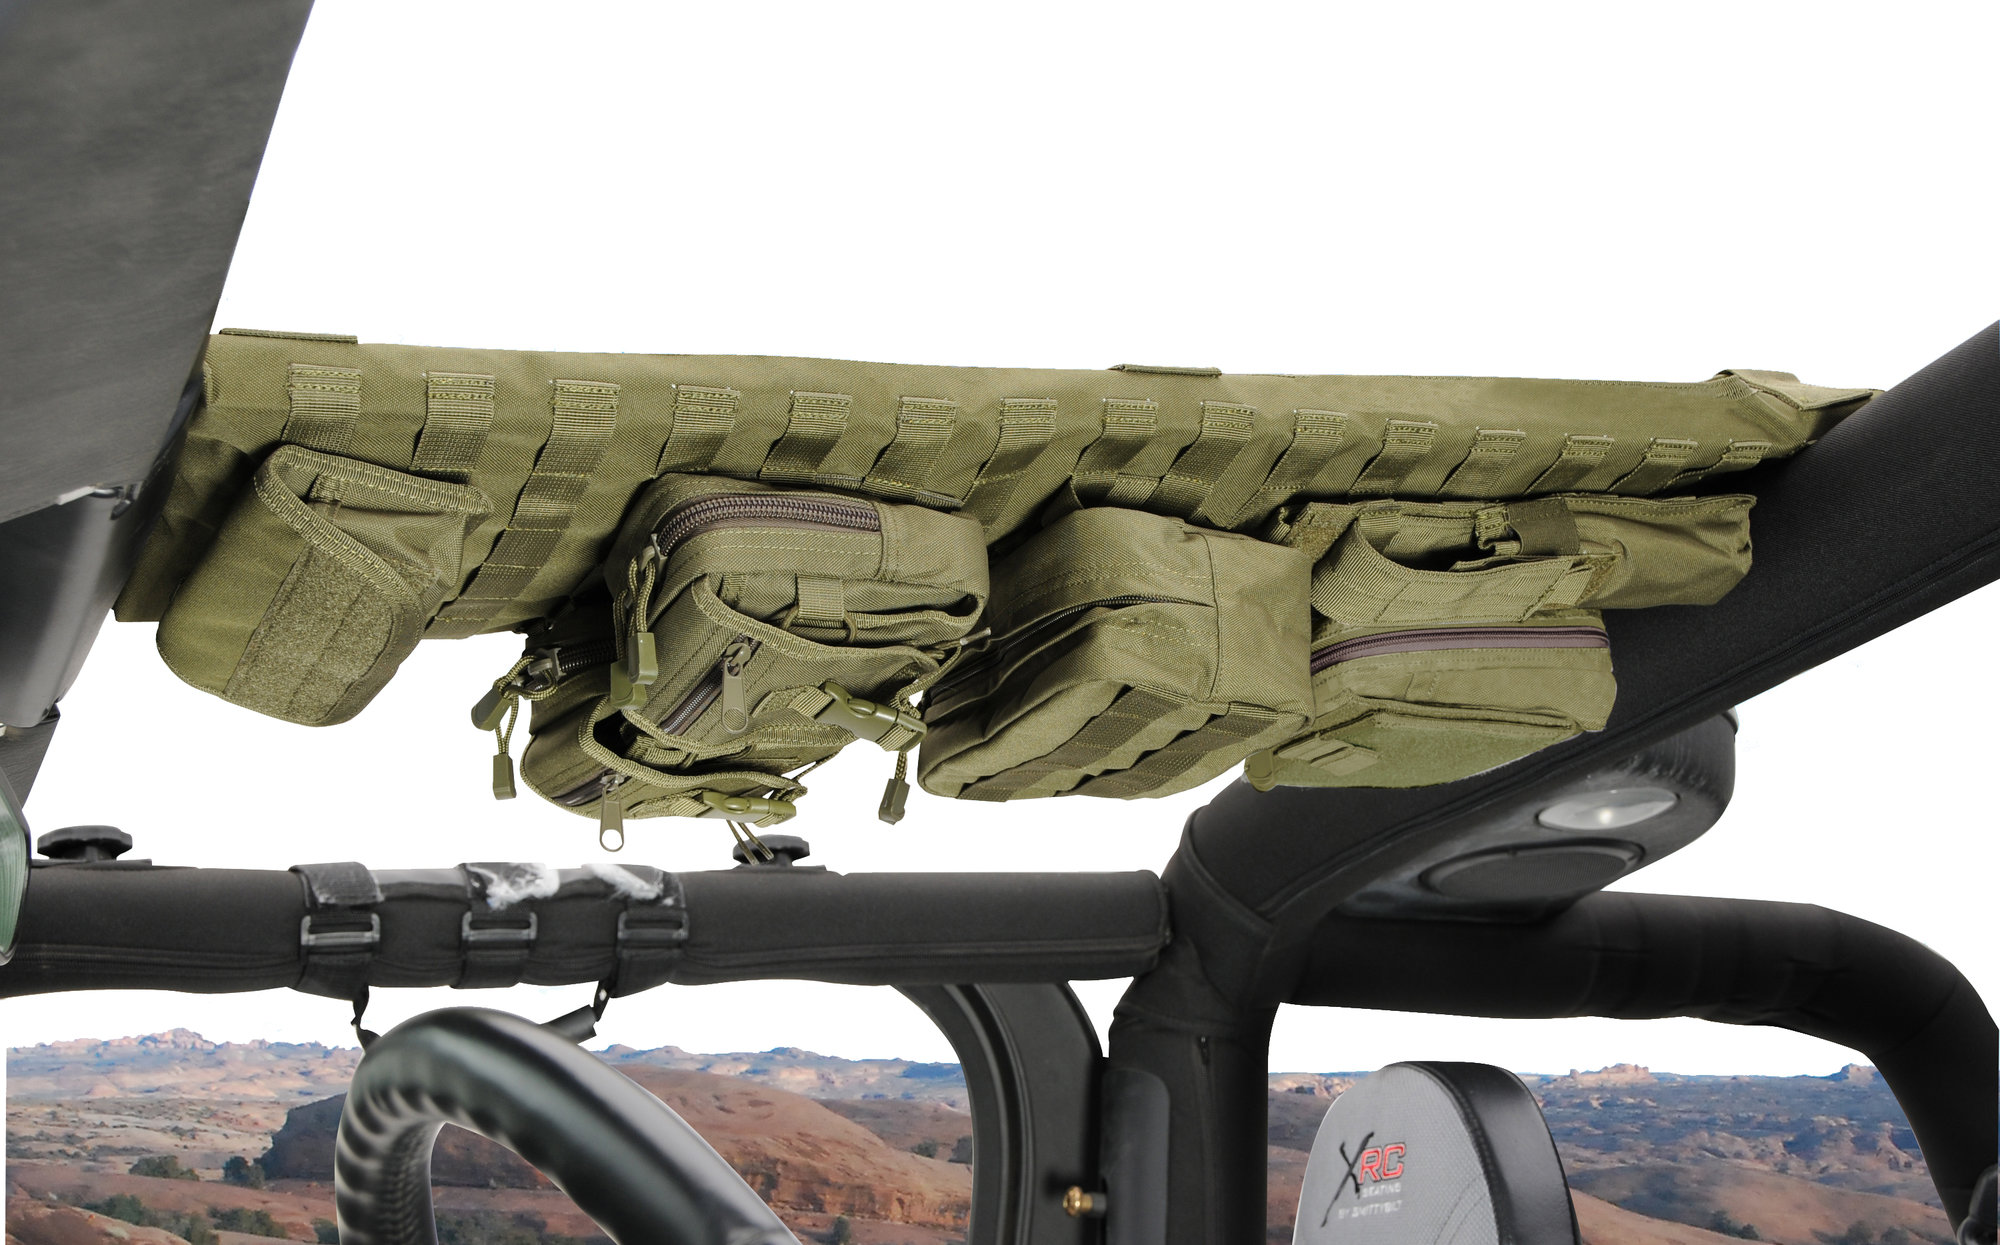

This picture isn't great since it is kind of dark in my garage right now but it shows how the radios are mounted. The Midland MXT400 GMRS radio is on the top using the factory Midland mounting bracket and hardware. I made the mount for the Icom IC-2730A out of 1" aluminum bar stock from Home Depot. The 4 aluminum brackets just attach to the MXT400 / mounting bracket.

I'll post some better photos tomorrow that show the details on how I set it up.

88696

88697
 

AK9R

Lead Wiki Manager and almost an Awesome Moderator
Super Moderator
Joined
Jul 18, 2004
Messages
9,341
Location
Central Indiana
The radio mounting is effective and handy, but in a roll-over or a roll onto the side? Ouch! For both you and your passenger.
 

ccg_ga

Member
Joined
Nov 24, 2018
Messages
112
Location
Cumming, GA
Here are some photos of the finished product. It will only let me attached 10 photos per post, so this is post 1 - see others below for the rest of the pictures.

I took a bunch of photos and made notes throughout the entire project, so I plan on doing an in-depth writeup for my website (southeast4x4trails.com/journal) over the next week or so. That will include more photos and a complete parts and tool list. I am also going to draw up a new diagram of the whole system in case others as well.

So here it is!

Front shot - both of the antennas are mounted on the front fenders. The Larsen NMO2/70B is on the left/passenger fender for the Icom IC-2730A (HAM). It is mounted using a Laird NMO straight mounting bracket. The Larsen NMO450CHW is on the right/driver fender for the Midland MXT400 (GRMS) also mounted using the same straight bracket.

88720
Close up of the antenna mounting brackets. I painted the top of the bracket the same color as the Jeep by using Mopar OEM touch up paint. I left the bottom of the brackets bare metal for a good ground. I removed a section of paint on the fender where each mount is located and used some clear RTV/silicone under the bracket as well. They are mounted using stainless steel machine screws and locknuts.

88724

88721

The antenna coax cable is protected by a layer of plastic spiral wrap on the cable and then plastic flex split tubing on top.

88723

All of the wiring and coax cable that is in the engine compartment is also wrapped with both plastic spiral wrap and flex split tubing. It runs along the top of the firewall and is attached in place using zip ties. The wiring includes the coax cable for both antennas, the 12V positive power feed in 8 gauge wire and also a smaller 12V constant line in 14ga wire that is run to the battery.

88725

88726

This is where all of the wiring enters the firewall via a Daystar universal firewall boot. It is to the right of the intake manifold on the driver's side. Yes, it is going to get hot in this position so that is why I wrapped all of the wiring and coax in both sprial wrap and flex split tubing.

88728

The 12V positive power feed is routed from the battery terminal to a Blue Sea Systems maxi fuse block with a 30A fuse. The fuse block is mounted to the inside of the front grill on the passenger side.

88727

From the fuse block above the 8 gauge 12V positive wire runs through the firewall and to another Blue Sea Systems Maxi fuse block which is mounted on the interior side of the firewall on the passenger side and under the dash.

88729

From this fuse block the 8 gauge power wire runs to a Blue Sea Systems distribution fuse block which is mounted under the passenger seat.

88730

It will only let me attach 10 photos per post, so see the next post/reply for more photos.
 

mmckenna

I ♥ Ø
Joined
Jul 27, 2005
Messages
23,839
Location
Roaming the Intermountain West
Looks really good.

Keep an eye on the split loom tubing where it runs near the exhaust manifold. The auto parts store grade stuff is not very durable and can melt if it gets too hot. You can get high temp rated split loom. They also make a metallic version that reflects heat pretty well. You can always put a piece over the section that's close to the manifold.

The second maxi-fuse isn't technically necessary. Probably won't hurt, but there can be a small voltage drop across fuses, so if it gives you issues down the road, it might be a good candidate for removal. But, probably not going to be an issue.

Looks really good, antennas turned out nice. Looking forward to seeing your write up.
 

ccg_ga

Member
Joined
Nov 24, 2018
Messages
112
Location
Cumming, GA
Post 2 - Continued from post 1 above.

On the distribution fuse block the power leads for the Midland MXT400 are on the left and the power leads for the Icom IC-2730A are on the right.

88731

Both the Midland MXT400 (top) and the Icom IC-2730A are mounted to a Smittybilt G.E.A.R MOLLE overhead console system. I used the factory supplied mounting hardware for the MXT400 and drilled holes for the mounting bracket machine screws into the overhead console and made small spacers that are between the mounting bracket and the overhead console to make the mounting surface rigid. I'll include more photos of this in my longer post that I mentioned on the first post/reply above.

I make 4 mounting brackets for the Icom IC-2730A out of 1" aluminum bar stock from home depot and painted them matte black.

88732

88733

The Icom IC-2730 radio chassis is wider than the MXT400 so I had to use spacers on the inside of the mounting brackets to match the width of the 2730A. The spacers are just #10 nylon flat washers that I painted black as well.

88734

88735

Each radio has a RF ground line that is attached to the radio body and then to the overhead console. The console is solid steel and is very well built, so I removed some paint and attached the RF ground lines to the top side of the console.

88736

And here is where the ground lines attached to the radios. Again, Midland MXT400 on top and the Icom IC-2730A is on bottom.

88737

All of the radio power leads and coax were routed through the plastic trim on the windshield to hide them quite well. Here is where the radio power leads exit the windshield trim.

88738

And the antenna coax lines

88739
 

ccg_ga

Member
Joined
Nov 24, 2018
Messages
112
Location
Cumming, GA
Part 3 - continued

Here is the interior DPDT switch that triggers the relay.

88740

And the SWR readings for both radios

Icom IC-2730A

88741

And Midland MXT400

88742
 

ccg_ga

Member
Joined
Nov 24, 2018
Messages
112
Location
Cumming, GA
Looks really good.

Keep an eye on the split loom tubing where it runs near the exhaust manifold. The auto parts store grade stuff is not very durable and can melt if it gets too hot. You can get high temp rated split loom. They also make a metallic version that reflects heat pretty well. You can always put a piece over the section that's close to the manifold.

The second maxi-fuse isn't technically necessary. Probably won't hurt, but there can be a small voltage drop across fuses, so if it gives you issues down the road, it might be a good candidate for removal. But, probably not going to be an issue.

Looks really good, antennas turned out nice. Looking forward to seeing your write up.


Thanks! Will do, unfortunately like with the antenna mounting options the firewall only has 2 or 3 entry points and the firewall boot that I used was really the only one large enough for all the wiring. Good suggestion on the high temp rated split loom - I'll check into that.

What are your thoughts on the SWR readings? I have seen that the ideal range is 1-1.5, so is possible some antenna trimming/tuning in order?
 

mmckenna

I ♥ Ø
Joined
Jul 27, 2005
Messages
23,839
Location
Roaming the Intermountain West
For mic hangers, you may want to consider two of these:

We use those on our patrol cars, and I've got one on my UTV. Strong magnet that will keep the mic in place on bumpy trails, easy to pull the mic off. Doesn't require lining up the button on the back of the mic to the clip, just get it close and the magnet takes over.
 

mmckenna

I ♥ Ø
Joined
Jul 27, 2005
Messages
23,839
Location
Roaming the Intermountain West
What are your thoughts on the SWR readings? I have seen that the ideal range is 1-1.5, so is possible some antenna trimming/tuning in order?

Usually anything below 2:1 is considered "good enough", but with some tweaking, you can usually do better. Having the antenna without a ground plane can create some challenges, so it may take some work. I think your mounts are fine, good quality antennas and mounts, you should be able to tune them a bit lower. When you do it, make sure you are out away from structures, lamp posts, anything that can reflect RF. Doing the tuning out in a parking lot or in the street is a good idea.
It takes some trial and error with an SWR meter, since it can only show you SWR on the specific frequency. Antenna analyzers can be handy since they'll show you a wider slice of spectrum, and allow you to see where the dip is, and adjust the antenna accordingly.
On the amateur radio, you can check SWR at the lower, middle and upper edges of the band, and plot those out. That should give you an idea where the sweet spot is. If the SWR is lower on the higher frequency, the antenna is too long. If it's lower on the lower frequency, it's too short. On the dual band radio, you'll have to mess with both 2 meters and 70 centimeters and find a happy point that works for both bands. On the GMRS radio, you can test on 462.550 and compare that to the repeater input frequency of 467.550 and see how it's doing. Usually for GMRS you can tune for 465MHz and be good on the simplex and repeated transmit frequencies. Since you'll likely be using this for simplex communications on the trail, you could tune for lowest SWR around 462.600MHz and be good.

Really looks good with the two nearly matching antennas on either side of the hood. The painted brackets are a nice touch.
 

WA8ZTZ

Member
Joined
Feb 23, 2014
Messages
977
Location
S.E. MI
Where the underhood split loom wiring penetrates the firewall is in the same location as a factory installed harness in split loom so probably will be OK. If it does get too hot then simply wrap it with a double layer of aluminum foil secured with zip ties.
If you really want to get fancy, go for the aerospace look and sheath it with Aeroquip Firesleeve (available from Aircraft Spruce).
 

mmckenna

I ♥ Ø
Joined
Jul 27, 2005
Messages
23,839
Location
Roaming the Intermountain West
The manufacturer loom is often a high heat rated, oil/gas resistant type. The stuff you get at the auto parts store usually isn't. It's often intended for home stereo installation.

These guys have been good in the past and sell the high heat and fire resistant stuff:
 

ccg_ga

Member
Joined
Nov 24, 2018
Messages
112
Location
Cumming, GA
@WA8ZTZ @mmckenna

The split loom I used is from Home Depot so it probably isn't as heat resistant as it needs to be. I ended up using like 5 or 6 packs of it to cover everything. I like the idea of having the heat resistant tubing at least for the run down to the firewall boot. I think the rest of it will be fine that isn't located near the manifold. I ran it around town today and so far the tubing looks fine at the firewall boot.

@mmckenna Thanks for the SWR info. I may give that a shot, but it sounds like another project for another day. I'm headed out on a ride this weekend so I should have a good chance to see how the radios perform in their current setup. Mostly GRMS I suspect though.

Those mic hangers are nice, thanks for the suggestion on those.
 

mmckenna

I ♥ Ø
Joined
Jul 27, 2005
Messages
23,839
Location
Roaming the Intermountain West
@WA8ZTZ @mmckenna

The split loom I used is from Home Depot so it probably isn't as heat resistant as it needs to be. I ended up using like 5 or 6 packs of it to cover everything. I like the idea of having the heat resistant tubing at least for the run down to the firewall boot. I think the rest of it will be fine that isn't located near the manifold. I ran it around town today and so far the tubing looks fine at the firewall boot.

Yeah, in the engine compartment is a good idea, but not necessary anywhere else. Last time I ordered it, I bought 100 feet, so it works out much cheaper than Home Depot, and it was just easy to buy all the same thing.

Thanks for the SWR info. I may give that a shot, but it sounds like another project for another day. I'm headed out on a ride this weekend so I should have a good chance to see how the radios perform in their current setup. Mostly GRMS I suspect though.

An SWR of 2:1 isn't ideal, but it's not going to hurt your radio. Enjoy the ride.

Those mic hangers are nice, thanks for the suggestion on those.

Expensive, but nice. Our officers love them since they can sort of toss the mic in the general direction of the hanger (same way my son throws things in the trash can) and it usually sticks. Great when they are mad at the dispatcher, or bored and want to play a game.
 

ccg_ga

Member
Joined
Nov 24, 2018
Messages
112
Location
Cumming, GA
That they are - almost $80 for both mics. I have the mic for the 2730A stuffed into one of the pouches on the overhead console. I'm sure after it falling out and hitting me on the head a couple of times this weekend I will probably pony up for the magnetic mounts.
 

AK9R

Lead Wiki Manager and almost an Awesome Moderator
Super Moderator
Joined
Jul 18, 2004
Messages
9,341
Location
Central Indiana
Nice work.

I think the only thing I would have done differently is eliminate the fuse in the positive lead going to the Midland radio. The inline fuse holders for the round glass fuses are notorious for poor connections and the plastic case will hold moisture which will lead to some corrosion.
 

ccg_ga

Member
Joined
Nov 24, 2018
Messages
112
Location
Cumming, GA
Nice work.

I think the only thing I would have done differently is eliminate the fuse in the positive lead going to the Midland radio. The inline fuse holders for the round glass fuses are notorious for poor connections and the plastic case will hold moisture which will lead to some corrosion.

So on that point, glad you mentioned it. @mmckenna suggested I drop the fuses on the power leads and I had planned to do that until I started working on wiring up the leads. If I pull the fuses out I would need to cut off the fuse holders and connect the ends of the leads with a butt connector/heat shrink. I was thinking that I may want to pull the leads out one day and move everything into a new Jeep (it's only a matter of time before I buy another one) and may not be able to mount everything like I did in this one, so I might run into an situation where I would need to track down new power leads, etc. Maybe not a big deal, but I decided to leave the power lead fuses as-is for now until they cause an issue. The Icom has them to, they are just under the carpet.

You make a good point about moisture though and causing corrosion. All of the vibration from riding on the trail might be an issue as well.
 

mmckenna

I ♥ Ø
Joined
Jul 27, 2005
Messages
23,839
Location
Roaming the Intermountain West
That they are - almost $80 for both mics. I have the mic for the 2730A stuffed into one of the pouches on the overhead console. I'm sure after it falling out and hitting me on the head a couple of times this weekend I will probably pony up for the magnetic mounts.

Yeah, only issue to watch out for is that the push to talk button doesn't get jammed.

When Magnetic Mics first came out, they were giving them away at one of the trade shows. I scored one. I bought a few more for my work truck. Still haven't bought one for my personal truck.
 

ccg_ga

Member
Joined
Nov 24, 2018
Messages
112
Location
Cumming, GA
Yeah, only issue to watch out for is that the push to talk button doesn't get jammed.

When Magnetic Mics first came out, they were giving them away at one of the trade shows. I scored one. I bought a few more for my work truck. Still haven't bought one for my personal truck.

So as I figured we were on some pretty rocky terrain today and I kept having to look up to put the Midland mic on its clip. Magnetic would have been great.

I also managed to bend the bracket the 2/70B and maybe the antenna itself. The coil on the antenna kept getting caught in branches on trees. Time to figure out how to make those brackets stronger!
 

mmckenna

I ♥ Ø
Joined
Jul 27, 2005
Messages
23,839
Location
Roaming the Intermountain West
I also managed to bend the bracket the 2/70B and maybe the antenna itself. The coil on the antenna kept getting caught in branches on trees. Time to figure out how to make those brackets stronger!

Not sure if it would fit under the hood, but I fabricated mine out of 1/8" or so aluminum bar stock.

This is what I fabricated onto a roll bar clamp mount. The NMO mount was recycled off an old mag mount base.


The challenge you'll have is making the NMO mounts fit. They are designed for thin sheet metal, like the roof of a car. You can get thick mount NMO's that will handle much thicker mounts, but you'd have to replace yours. You could probably get creative with some aluminum stock and make a brace for the ones you have.
 
Status
Not open for further replies.
Top