• To anyone looking to acquire commercial radio programming software:

    Please do not make requests for copies of radio programming software which is sold (or was sold) by the manufacturer for any monetary value. All requests will be deleted and a forum infraction issued. Making a request such as this is attempting to engage in software piracy and this forum cannot be involved or associated with this activity. The same goes for any private transaction via Private Message. Even if you attempt to engage in this activity in PM's we will still enforce the forum rules. Your PM's are not private and the administration has the right to read them if there's a hint to criminal activity.

    If you are having trouble legally obtaining software please state so. We do not want any hurt feelings when your vague post is mistaken for a free request. It is YOUR responsibility to properly word your request.

    To obtain Motorola software see the Sticky in the Motorola forum.

    The various other vendors often permit their dealers to sell the software online (i.e., Kenwood). Please use Google or some other search engine to find a dealer that sells the software. Typically each series or individual radio requires its own software package. Often the Kenwood software is less than $100 so don't be a cheapskate; just purchase it.

    For M/A Com/Harris/GE, etc: there are two software packages that program all current and past radios. One package is for conventional programming and the other for trunked programming. The trunked package is in upwards of $2,500. The conventional package is more reasonable though is still several hundred dollars. The benefit is you do not need multiple versions for each radio (unlike Motorola).

    This is a large and very visible forum. We cannot jeopardize the ability to provide the RadioReference services by allowing this activity to occur. Please respect this.

09 Ford Escape

Status
Not open for further replies.

ILMRadioMan

Member
Joined
Feb 14, 2009
Messages
404
Location
The road to no where.
So these escapes are pretty interesting boogers.

But here is the setup.

Like most others: front & back corner strobes, wigwags, visor lights. Siren. Radio.

All are controlled by switches. Lights on 1 relay controlled by switch. Siren on 1 relay switched. Radio ignition wired to red switch with soft power off programmed.

800 MHz Blade antenna on NMO roof mount.


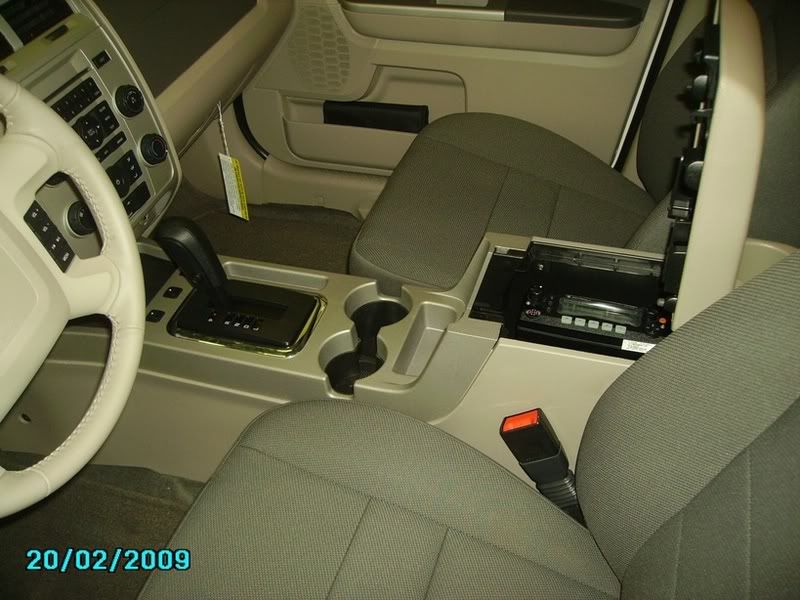
Here is the inside drivers area

Insidefront1.jpg


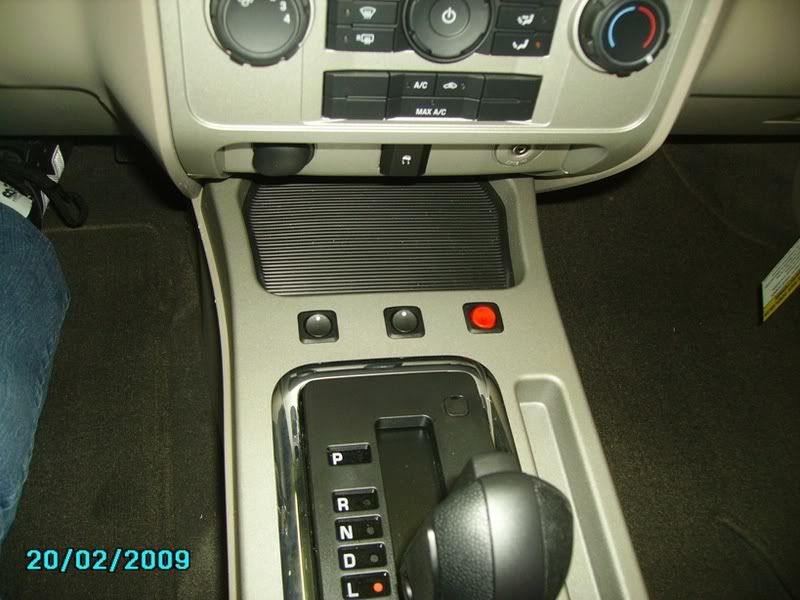
Here is the switch area

Switches1.jpg


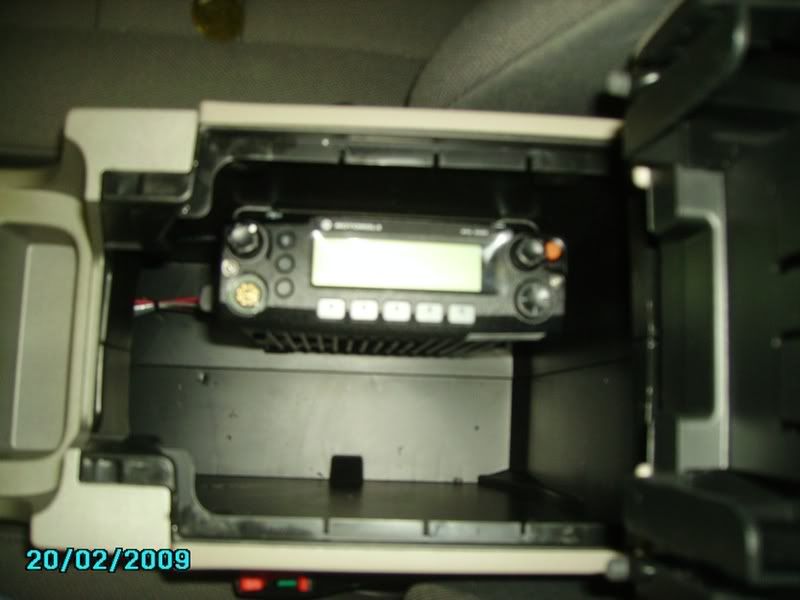
Here is the radio mounted in the arm rest

RadioinConsole1.jpg


Now here is the fun part. We ran the power to the rear. The power is fused at the battery, AND at each relay. There is the empty storage area under the rear carpet.

StrobeandSirenbox1.jpg


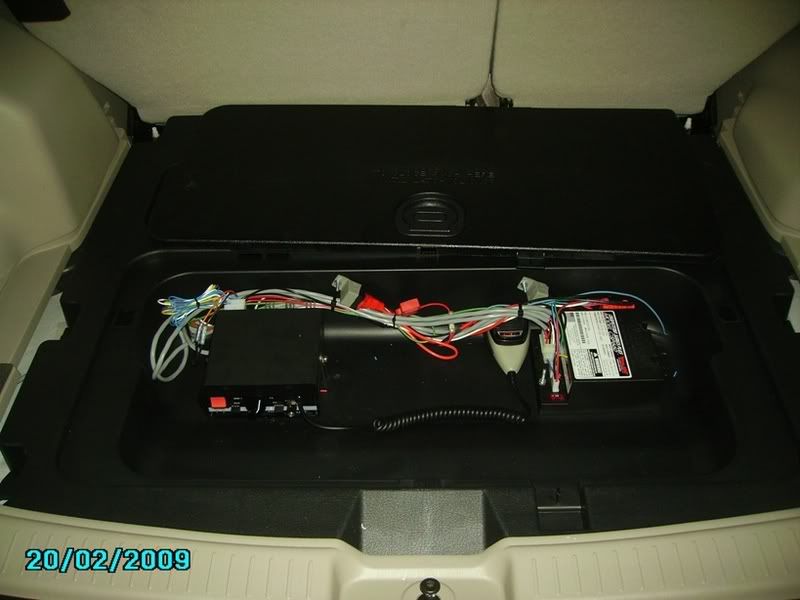
Hadnt finished split looming everything at this point, but you get the idea.
 

code3cowboy

Member
Joined
Aug 22, 2006
Messages
656
Location
CA-CZU
A unitrol 80k has a smaller footprint and is perfect for a u/c install plus you can use a progressive switch to control both the lights and the siren. You can even put them into some massive sterio amp enclosures for Narc cars.
 

Thunderknight

Member
Premium Subscriber
Joined
Jan 31, 2008
Messages
2,220
Location
Bletchley Park
How did you pull power to the back? Under the vehicle or through the interior? If the interior, did you have to drill the firewall, or was there something useful to go through?
Thanks
 

ILMRadioMan

Member
Joined
Feb 14, 2009
Messages
404
Location
The road to no where.
How did you pull power to the back? Under the vehicle or through the interior? If the interior, did you have to drill the firewall, or was there something useful to go through?
Thanks

We didnt drill any holes in the firewall.

Behind the steering column there is a premade hole with a removable rubber seal. We just pulled the seal out and ran the power that way.

Then we ran it under the kick panels under each door. Next to the seat on either side there is a plastic piece that is a hump covering the wheel well area. We pulled the cable out there, then unbolted the black plastic storage area container. Drilled holes on this plastic to bring the cables to the storage area.

We did a few remote heads like this too, and the standard control cable will make it, as long as the radio is on the same side the you run the control cable through.
 

Yanith

Member
Joined
Aug 11, 2009
Messages
1
Help i need to remove my stereo

wow awesome wish i could have a siren :p

i just got a new 09 tribute and i would like to install a Mazda 02+ GROM iPod Adapter Direct Interface(GROM-I2-MAZ) but i don't find any easy ways to take the stereo out. do you happen to know how to do it? i don't want to break anything, and some guys here were trying to charge 385 to install it (just for labor), even when i have my own cables.
 

Jkendr23

Member
Joined
Sep 21, 2003
Messages
18
Location
Hinesville, GA
The radio removal takes about 20 minutes. The radio/climate control panel removes as 1 unit. You will need a hook tool and a hand driver/small ratchet with a 7mm and 8mm socket, a towel or some cloth to prevent scratches to your dash panels, and a flashlight (optional). Using a hook tool, hook the air vent grille above the radio. I hook the vent at the lower right corner and pull straight toward the rear. Do this for both sides and the vent grille will release. There is a wire attached to this, so carefully place the vent grille up onto the top of the dash above the vent opening. Do the same at the panel below the radio/climate control. This is just above the center console (The fit is a little tighter here so use some patience!). After removal, disconnect the wires from the rear of this panel and set it aside. A this point, you should have access to four 7mm screws that hold the radio to the dash. Two are above the radio near the vent area and two are RECESSED where the lower panel was removed. You may have to look for the lower screws using a flashlight, especially if your vehicle has the glossy black panels. These 2 screws really know how to hide! After removing the four 7mm screws, you will be able to pull the radio from the dash a few inches. There is a braided wire strap (perhaps for grounding?) that is attached to the right-side radio frame with an 8mm screw. Remove this and you should be able to pull the radio out enough to access the cables that plug into the rear of the radio. That's all there is to it! Remember to re-connect all cables when re-installing! Please post pics!
 

cforput

Member
Joined
Sep 26, 2009
Messages
1
What is a hook tool?

Does anyone know what Jkendr23 meant by a "hook tool"? Is this just any type of "hook" that you can insert into the air vent grill to help pull it straight out?

I need to get to my radio behind the cover.
 

medic_david

Member
Joined
Jul 23, 2009
Messages
0
Location
Olathe, KS
wigwag question for ILMRadioMan

Can you tell me how you were able to isolate the highbeams? I have an '08 and when I tapped into the highbeam wires found they are on the same circuit. So how did you get them to alternate? Did you have to cut the wires and rewire them completely through the flasher? I have a Code3 700 flasher and a 360RS model. Can you advise which will work or work better?

Thanks-
 

ILMRadioMan

Member
Joined
Feb 14, 2009
Messages
404
Location
The road to no where.
Well as you can tell its been about a year.

However, if I remember correctly there is a wire into the lights that controls the high beam. On the first one I believe we just took a multimeter and flipped the high beam on and off to see which wire had 12v on and off.

That would be my suggestion for you.

However, it IS one of those wires.
 

medic_david

Member
Joined
Jul 23, 2009
Messages
0
Location
Olathe, KS
Thanks, I have identified that wire, but if I splice into it, and use either model flasher, they don't alternate. They just flash simultaneously, though I can hear the flasher working correctly. Apparently they are both on the same circuit, my question is how can I break that circuit and still have normal use of the high beams? Any help or thoughts would be much appreciated.

Thanks again-
 

KJ4NFP

Member
Joined
Mar 3, 2008
Messages
30
Location
Richmond, VA
My two cents...

Regarding the "wig-wag" question. I face the same issue with impala installs. I choose not to use the pre-fab units. You will have to physically cut the circuit connecting each high beam. I usually do this at the passenger light. Once the mating wire is cut, wire left and right to each end - one to the passenger and one to the other end of the cut wire that goes to the driver side. Most generic flashers I have found keep that circuit normally closed until the falsher is cut on. That would mean that your high beams will work normally until the flasher is activated by the driver. Check your flasher before the install to be sure it functions this way. I typically use code-3 or galls equipment.

RJC
kj4nfp
 
Status
Not open for further replies.
Top