What's your thoughts on the performance of the A1531B on the truck?

You are using an out of date browser. It may not display this or other websites correctly.
You should upgrade or use an alternative browser.
You should upgrade or use an alternative browser.
K7MFC mobile shack: 2019 Ford F-150 XLT
- Status
- Not open for further replies.
I'm pleased with it - works well on all the repeaters in the area. I'm mostly active on 70cm DMR on this radio + antenna, and the performance has been good. RX is also very good, I wanted a wide band antenna for 2m simplex and analog VHF listening for wildfire comms in the state, in addition to the 70cm use. I'm also pulling in distant NOAA weather stations clearly.
Last edited:
Thanks! Been looking at a couple antennas and that points me another direction.
JDrisc3480
Member
That is a great looking install
What's your thoughts on the performance of the A1531B on the truck?
Unsolicited opinon here, but I also use the A1531B. I swapped to it a few years ago after using the similar Larsen and Laird versions. It's wider banded, and swept better at the tuned freqs.
Just saw your install and I'm diggin' it! I just finished one myself but haven't posted the photos yet. I installed a spare NMO mount as long as I had everything apart and you've given my some ideas. Again, a job well done.
Looking forward to seeing the photos of your install! Installing a spare antenna mount isn't a bad idea. I had to drop the headliner a second time in my old truck to replace a faulty mount, definitely not something I want to do more than once. Having a spare mount gives you lots of options for re-configuring the radios in your vehicle.
Welp, the time came to remove the entire console to make some wiring changes. But I must have used the German torque wrench on this install because the hex bolts that attached the console to the mounting bracket were on gütentight. I ended up completely rounding out the 3mm hex head. A Dremel and a cutting wheel was needed to make a notch on the head of the bolt, and I was able to break it free with a flat head screwdriver.


Take home lesson for your own radio install: not every fastener always needs to be tightened down to 1000 ft lbs. I'm probably guilty of overtightening screws and bolts on occasion, and this isn't the first time I've needed to bust out the Dremel to remove a rounded out bolt that was my own darn fault . No permanent damage done though, and all 4 bolts were replaced and not overtightened this time around.
Take home lesson for your own radio install: not every fastener always needs to be tightened down to 1000 ft lbs. I'm probably guilty of overtightening screws and bolts on occasion, and this isn't the first time I've needed to bust out the Dremel to remove a rounded out bolt that was my own darn fault
. No permanent damage done though, and all 4 bolts were replaced and not overtightened this time around.
Last edited:
mmckenna
I ♥ Ø
Youch.
Dremel to the rescue...
Yeah, we used to have a saying: "It's not the one bolt that holds the whole truck together." I've been guilty of over torquing fasteners, and with stainless steel, you usually pay for it dearly. Small hex socket head screws are the worst.
Dremel to the rescue...
Yeah, we used to have a saying: "It's not the one bolt that holds the whole truck together." I've been guilty of over torquing fasteners, and with stainless steel, you usually pay for it dearly. Small hex socket head screws are the worst.
I love that console. I have a 2012 expedition fleet model with the column shift and I wanted to put that console in there but they don't make it for my year. Not havis, troy or jotto.
iMONITOR
Silent Key
Beautiful job, lots and lots of work, and it paid off! Great documentation & pictures of the project!
KA4WFI
Newbie
Matt--
I'm installing a Yaesu FTM-300DR 2m/70cm dual-band transceiver in the speaker/dash tray on my 2019 F-150 XLT using a BuiltRight mount. Is there a way to route a power/ground cable from the battery and ground point, through the firewall grommet, then up through the dash and to the tray? I want to avoid loose hanging power/ground wires as well as not having to splice into the power harness for the 12v power point on the front of the dash. Also looking to run the coax down through the console and under the passenger-side carpet to the right rear door, as I've done on several F-150s since my first one in 1997.
Your installation is top-notch. But my XLT has the center console, so one like yours isn't an option. Hence, the BuiltRight rack in the dash tray.
Tnx & 73.
--Hap (KA4WFI)
Last edited:
Matt--
I'm installing a Yaesu FTM-300DR 2m/70cm dual-band transceiver in the speaker/dash tray on my 2019 F-150 XLT using a BuiltRight mount. Is there a way to route a power/ground cable from the battery and ground point, through the firewall grommet, then up through the dash and to the tray? I want to avoid loose hanging power/ground wires as well as not having to splice into the power harness for the 12v power point on the front of the dash. Also looking to run the coax down through the console and under the passenger-side carpet to the right rear door, as I've done on several F-150s since my first one in 1997.
Your installation is top-notch. But my XLT has the center console, so one like yours isn't an option. Hence, the BuiltRight rack in the dash tray.
Tnx & 73.
--Hap (KA4WFI)
Hap,
From the battery one way through the firewall would be the filler/ blank plate that covers the hole where the clutch pedal assembly passes through. In most cases it is plastic. Use a grommet and silicone the hole once you are done. Stay up high away from your brake pedal, gas pedal and steering column. Once the tray is removed to install the BuiltRight you should be able to see right up into the tray area. Good luck and remember, Look 100 times and drill once!
Take a look inside the engine compartment on the driver's side - there is a big rubber grommet through which a wiring harness runs:

You can (carefully) cut a small notch in this grommet, away from the existing wires, and cut a corresponding hole on the interior side of this grommet to run the power wires through:
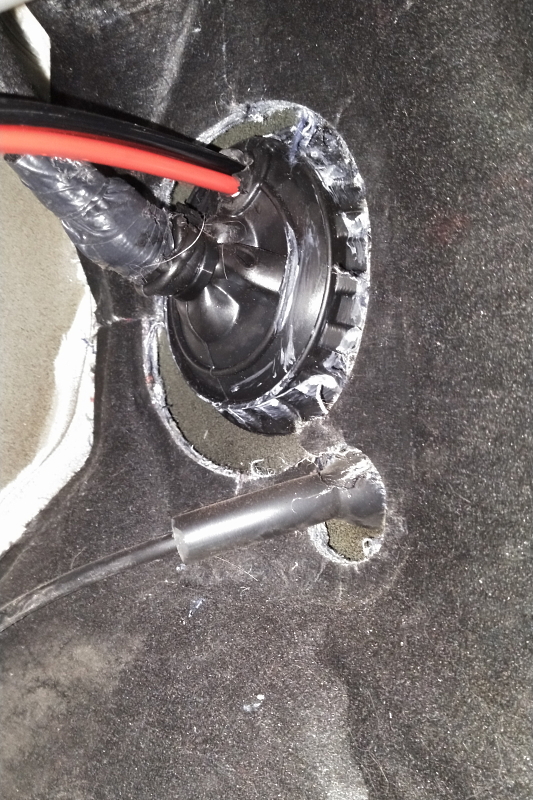
Conveniently, there's a little circle at the 12 o'clock position on the big grommet to do this. As the comment above from SurgePGH mentioned, there will be plenty of room to run the power from the firewall up to the top of the dashboard. Removing the tray will reveal this area nicely.
As for running the coax, you may find it easier to run it from behind the dash and down either door jamb floor plate channel as as I did here:
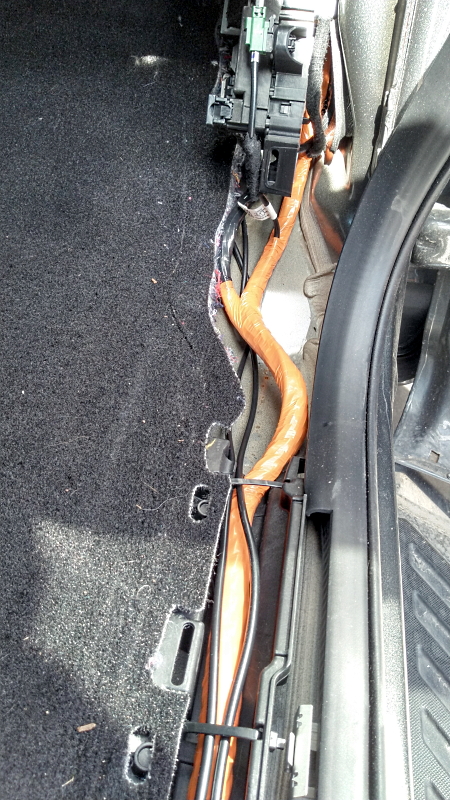
My 2013 F-150 had the full length center console and I did the same thing - ran the coax this way as opposed to down the console, under the carpet, and up the door to the antenna mount. Let me know if I can help in any way, and definitely post pics here when it's done!
You can (carefully) cut a small notch in this grommet, away from the existing wires, and cut a corresponding hole on the interior side of this grommet to run the power wires through:
Conveniently, there's a little circle at the 12 o'clock position on the big grommet to do this. As the comment above from SurgePGH mentioned, there will be plenty of room to run the power from the firewall up to the top of the dashboard. Removing the tray will reveal this area nicely.
As for running the coax, you may find it easier to run it from behind the dash and down either door jamb floor plate channel as as I did here:
My 2013 F-150 had the full length center console and I did the same thing - ran the coax this way as opposed to down the console, under the carpet, and up the door to the antenna mount. Let me know if I can help in any way, and definitely post pics here when it's done!
KA4WFI
Newbie
Matt--
Thanks so much to you and SurgePGH for the info and the photos.
I had forgotten, but what you show is what I did on my 2003 F-150 (3 trucks ago). I had a Yaesu mobile dual-bander mounted inside the console with the control head on a dash bracket originally intended for just an XM satellite radio head, but I made an adapter plate to hold both the XM and Yaesu heads. The power cable was routed from thru the firewall grommet up behind the dash, then to the console; the separation cable and coax cables were routed from the console to behind the dash, with the separation cable going to the control head and the coax cable routed behind the passenger-side dash down to the right door jamb floor plate channel and out.
Just before the '19 XLT, I had an '09 Lariat I inherited from my Dad and only used a dual-band handy-talkie with a Cushcraft dual-band mag-mount antenna. The console was problematic and there wasn't anywhere I could put a mobile rig without numerous issues, so I didn't try. After some Googling, I found that the BuiltRight bracket allows for a neat installation in the '19 XLT dash tray. Plus, I'll have a BlueParrott bluetooth mono headset paired with the new rig. No hanging power cable, coax, or mic to harass my most important passenger (my wife) when we travel, i.e., "happy wife, happy life."
The outside installation includes a Larson Electronics 3rd-brake light magnetic antenna mounting plate, forward-facing since I have an ARE top, with a new COMPACTenna 2m-70cm NMO on a mag-mount. The helical antenna works great with my Yaesu FT3DR handy-talkie (actually better than with my Cushcraft dual-bander), so I'm looking forward to using the mobile rig.
I'll be sure to take some photos to post.
73--Hap (KA4WFI)


Console -Havis Part # C-VS-1100-F150-2 (2015-2019 F-150)
Antenna -Tramm Dual band on Duplexer for the NX-5000 Kenwood's ( Front Fender L Bracket Mount)
I'm going to modify my ground from the battery negative terminal to the chassis ground block as you did also.
Antenna -Tramm Dual band on Duplexer for the NX-5000 Kenwood's ( Front Fender L Bracket Mount)
I'm going to modify my ground from the battery negative terminal to the chassis ground block as you did also.
- Status
- Not open for further replies.
Similar threads
- Replies
- 0
- Views
- 683
- Locked
- Replies
- 8
- Views
- 2K
- Replies
- 16
- Views
- 5K